USB drives remain one of the most persistent data loss and malware introduction vectors in corporate environments. An employee can walk out with gigabytes of sensitive data on a device that fits in a pocket, or plug in an infected drive that bypasses every network-layer control you have in place.
Microsoft Intune provides a native mechanism to address this through the Device Control policy, built on Microsoft Defender for Endpoint’s device control capabilities. You can block all removable storage across your device fleet and then selectively carve out exceptions for specific, trusted devices – identified precisely by serial number, vendor ID, or other hardware attributes.
This article walks through the full implementation from start to finish: first establishing a block-all baseline to verify everything is working as expected, then using the Device Control report to identify devices, and finally adding allow exceptions for specific approved hardware.
Table of Contents
- Prerequisite: Defender for Endpoint Onboarding
- How Device Control Works in Intune
- Step 1: Create a Reusable Settings Group for All Removable Media
- Step 2: Create the Device Control Policy
- Step 3: Configure the Access Entries for the BLOCK Rule
- Step 4: Verify the Block is Working
- Step 5: Use the Device Control Report to Identify Devices
- Step 6: Create a Reusable Settings Group for the Allowed Device
- Step 7: Add the Allow Rule to the Policy
- Allowing Printing on Any Printer
- Choosing the Right Device Identifier
- Troubleshooting
- What’s Next
- Microsoft Documentation
Prerequisite: Defender for Endpoint Onboarding
Device Control in Intune relies on Microsoft Defender for Endpoint to enforce policies and generate audit events. Devices must be onboarded to Defender for Endpoint before any Device Control policy will take effect. A device that has received the policy but is not onboarded will not enforce the rules and will not appear in the Device Control report.
If your devices are managed through Intune, onboarding is typically handled via the Endpoint security > Endpoint detection and response policy using the Auto from connector onboarding package. Verify that devices show a Sensor health state of Active in the Microsoft Defender portal before proceeding.
How Device Control Works in Intune
Device Control in Intune operates through Endpoint Security > Attack Surface Reduction policies, using the Device Control profile type. It has two main building blocks:
Reusable Settings Groups define which devices a rule targets. A group contains one or more entries describing device classes or specific devices by their hardware attributes. Groups are shared across policies – any change to a group automatically propagates to every policy that references it.
Device Control rules within the policy define what access is permitted or denied for the devices matched by the settings group. Each rule specifies included devices, excluded devices, and one or more access entries that define the type (Allow, Deny, Audit), the access mask (Read, Write, Execute, etc.), and any notification behavior.
The policy also exposes a Default Enforcement setting at the Defender level, which determines what happens to any device not matched by any rule. Setting this to Default Deny Enforcement is the correct posture for most environments: everything is blocked unless an explicit Allow rule matches.
Step 1: Create a Reusable Settings Group for All Removable Media
Before creating the policy, build a reusable settings group that covers all relevant device classes. This group will be the target of the block rule.
Navigate to Endpoint security > Attack surface reduction, open Reusable settings, and create a new group for Windows 10 and later.
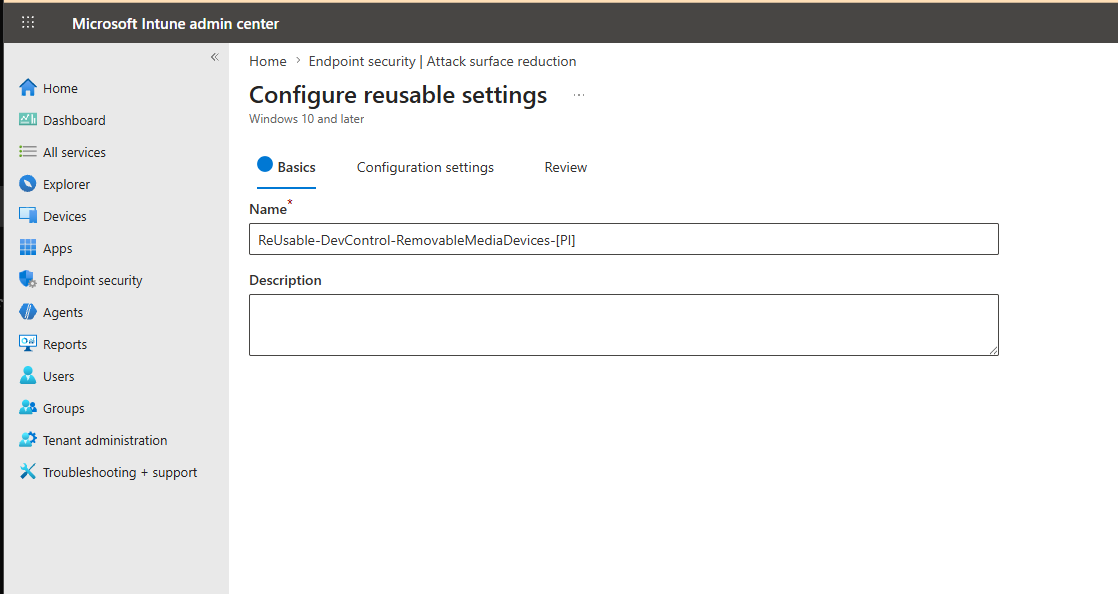
The name ReUsable-DevControl-RemovableMediaDevices-[PI] makes the group’s purpose and scope immediately clear to anyone reading a policy reference.
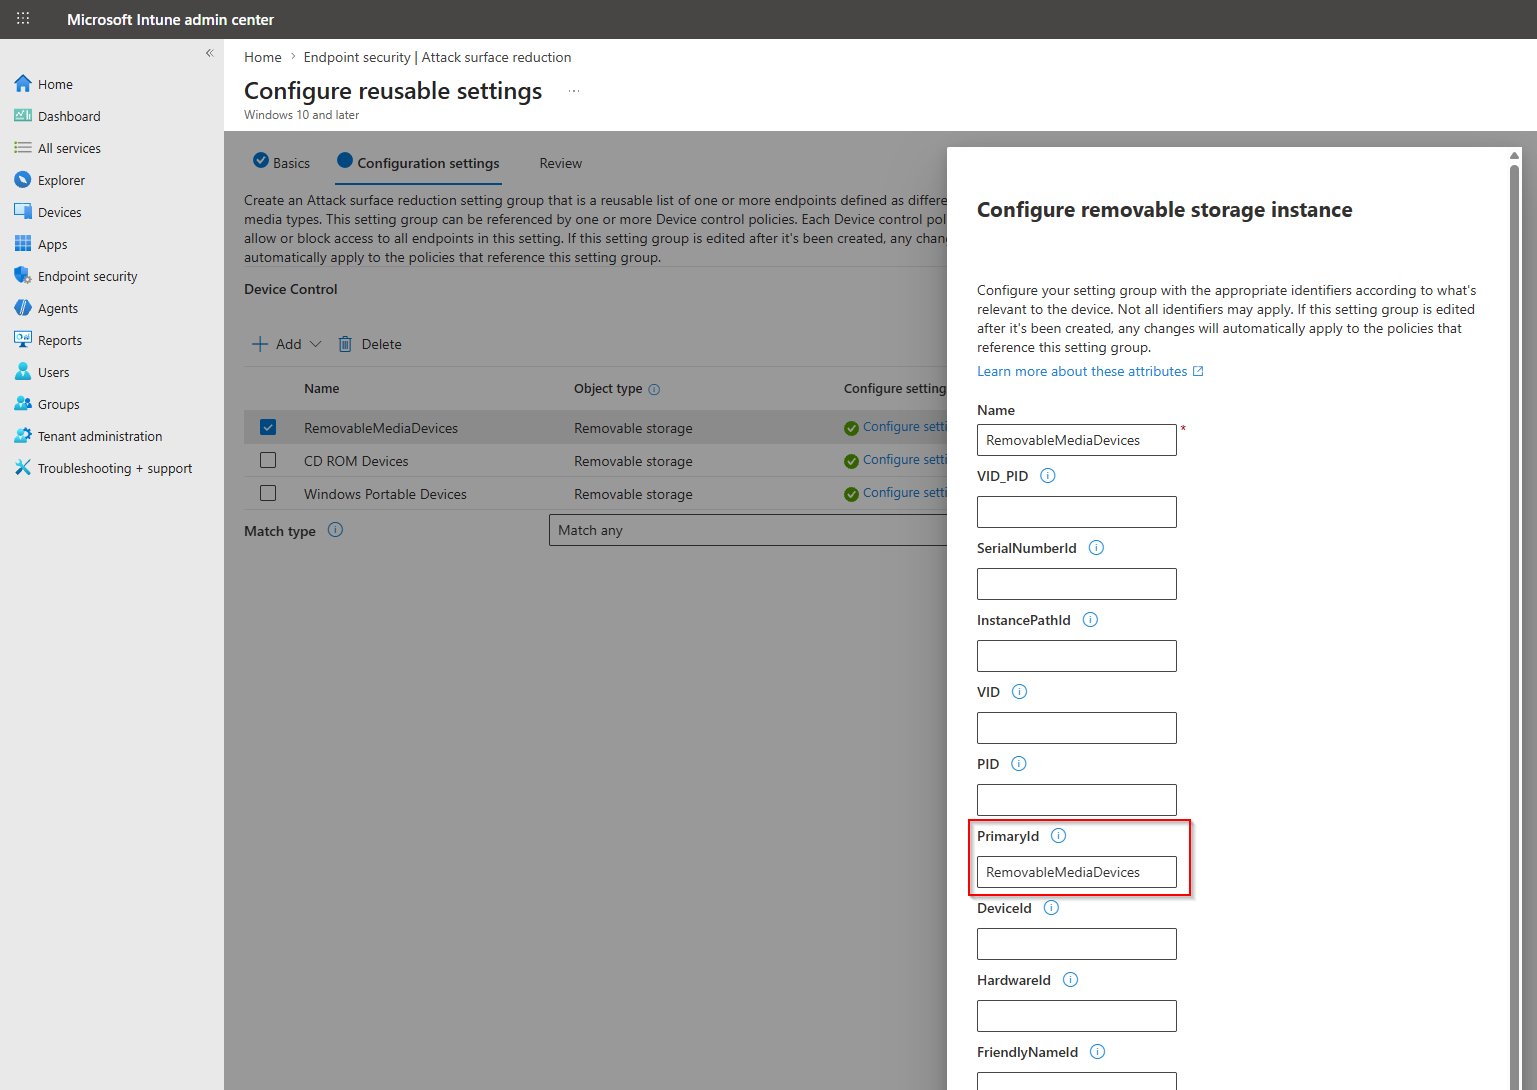
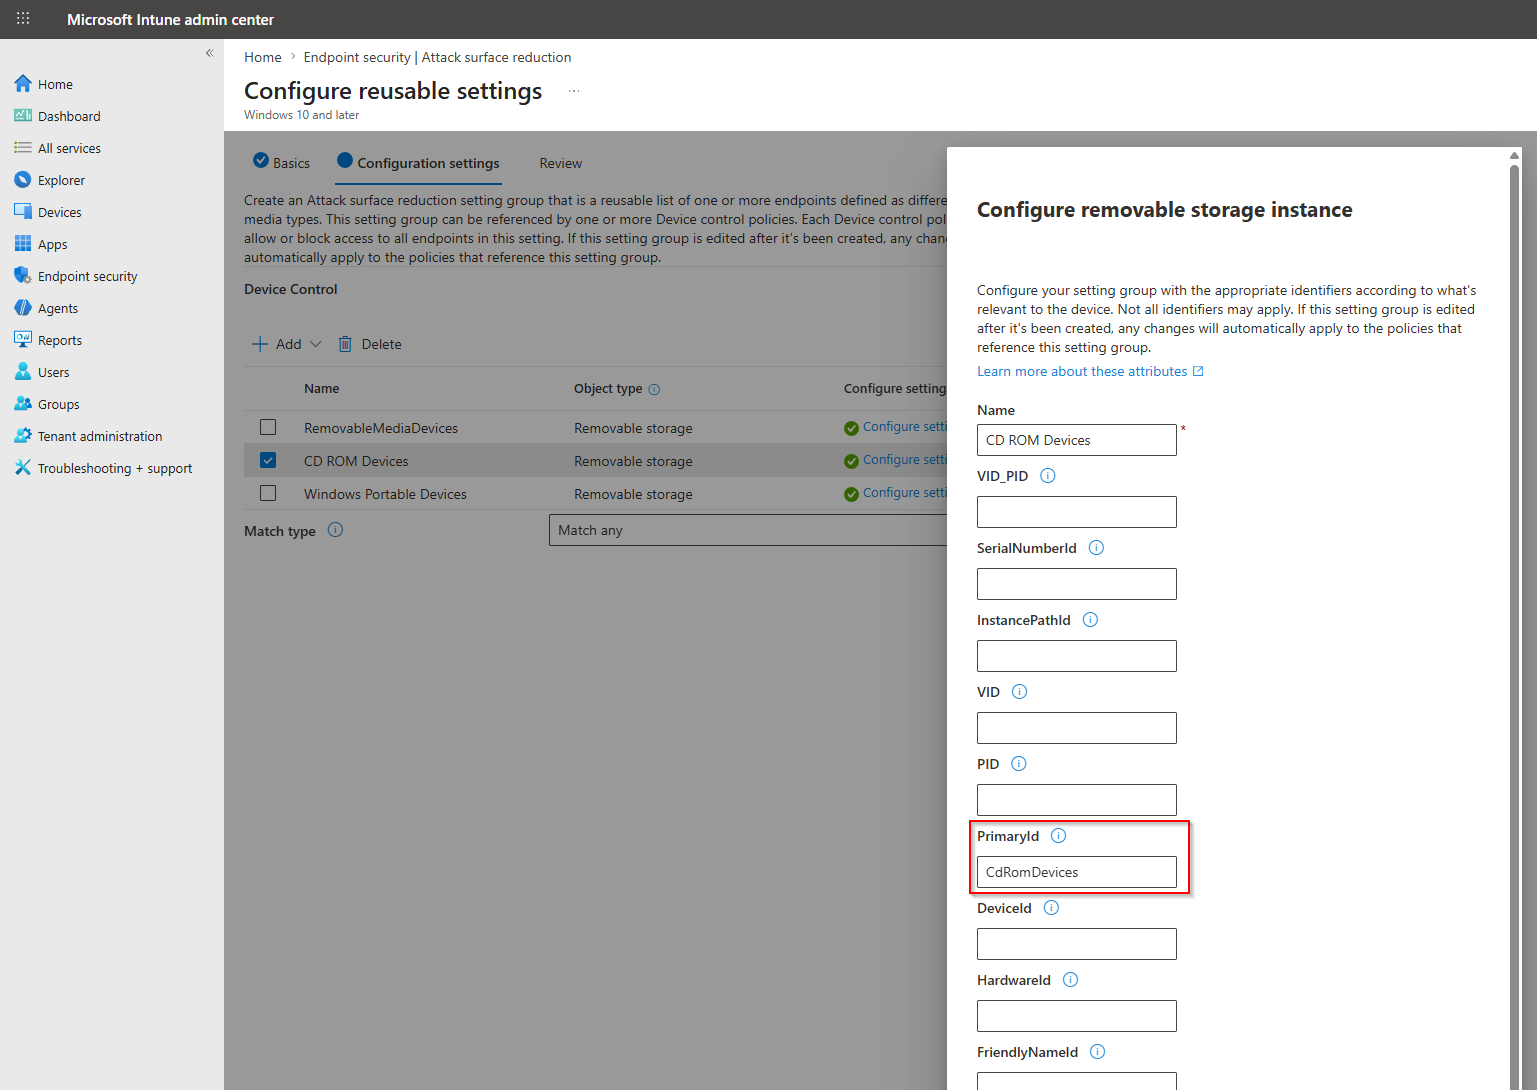
On the Configuration settings tab, add three entries to cover all common removable storage classes:
RemovableMediaDevices – standard USB mass storage devices such as thumb drives and external hard drives. Set PrimaryId to RemovableMediaDevices and leave all other identifier fields empty.
CD ROM Devices – optical drives. Set PrimaryId to CdRomDevices.
Windows Portable Devices – the WPD device class covers smartphones, cameras, and other devices connecting via MTP. Without this entry, a blocked user could still transfer files through their phone. Set PrimaryId to WpdDevices.
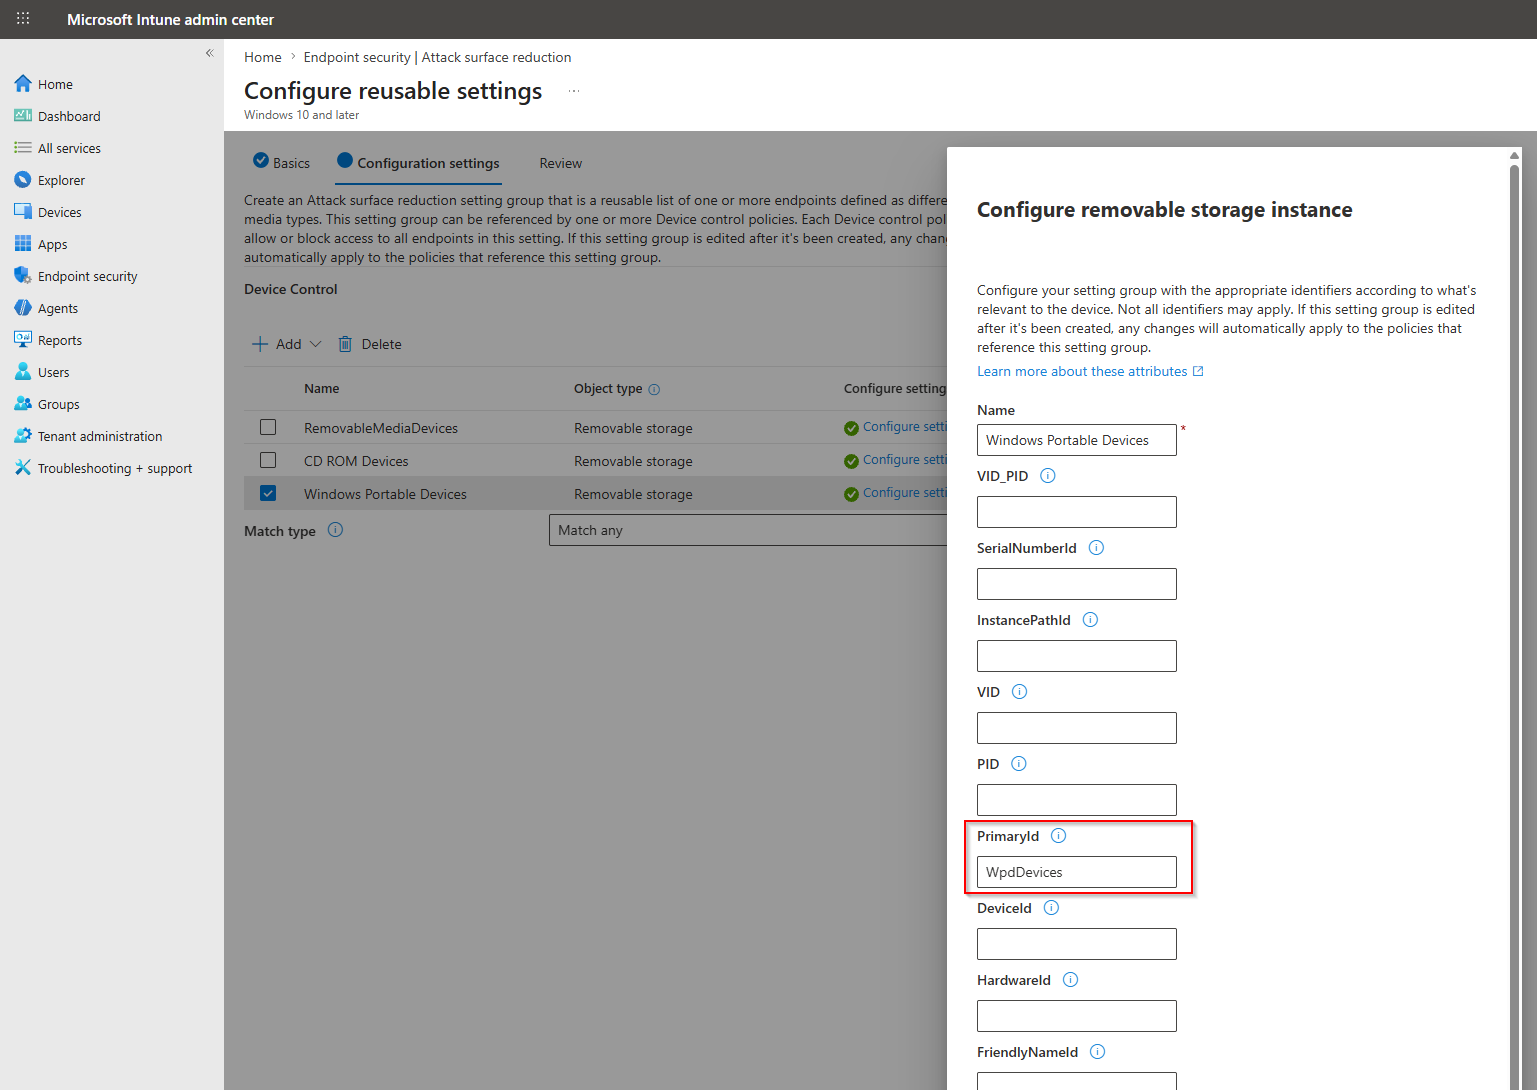
Leave the Match type as Match any. The group now covers all common removable storage classes.
Step 2: Create the Device Control Policy
Navigate to Endpoint security > Attack surface reduction and create a new policy. Select Windows as the platform and Device Control as the profile type.
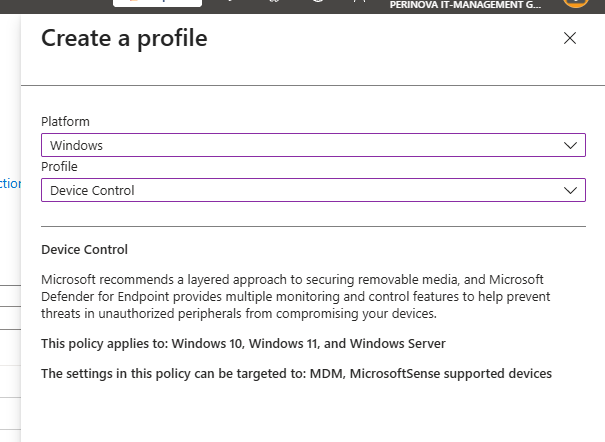
Name the policy, for example EPSec-ASR-Win-USBDeviceControl-[PI].
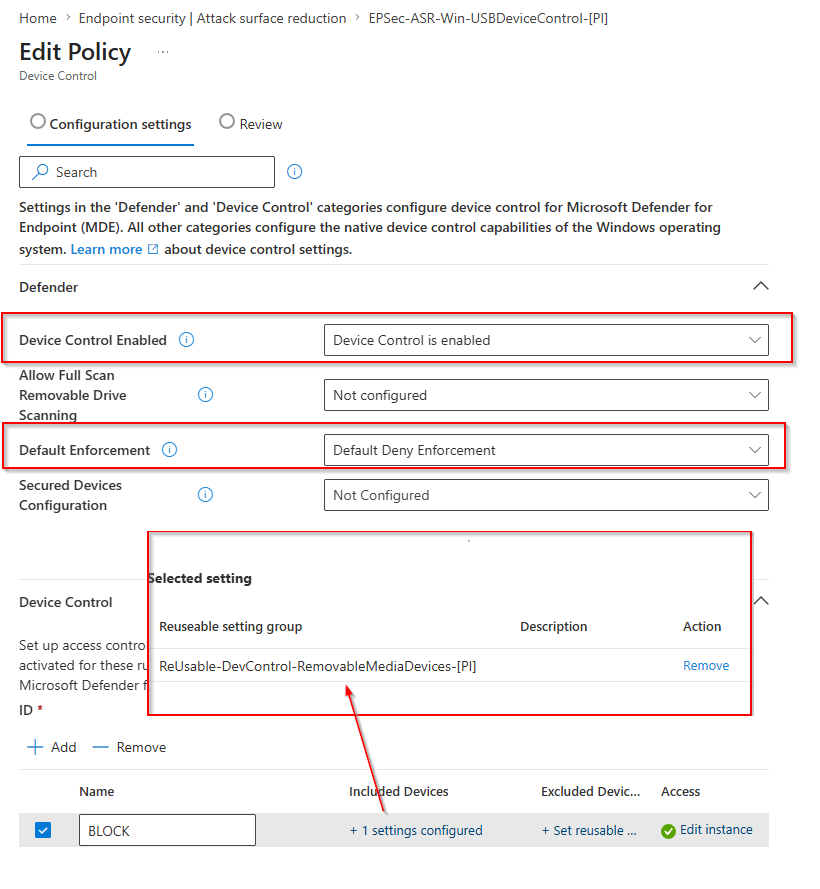
On the Configuration settings tab, the first section to configure is Defender:
- Device Control Enabled:
Device Control is enabled - Default Enforcement:
Default Deny Enforcement
Both settings are highlighted in the screenshot below. Default Deny is the foundational setting: any device not explicitly allowed will be blocked. The explicit BLOCK rule added below is not strictly required for enforcement, but it enables audit events and user-facing notifications – both essential for operational visibility and helpdesk triage.
Under the Device Control section, add a new rule named BLOCK. For Included Devices, reference the reusable settings group created in Step 1.
Step 3: Configure the Access Entries for the BLOCK Rule
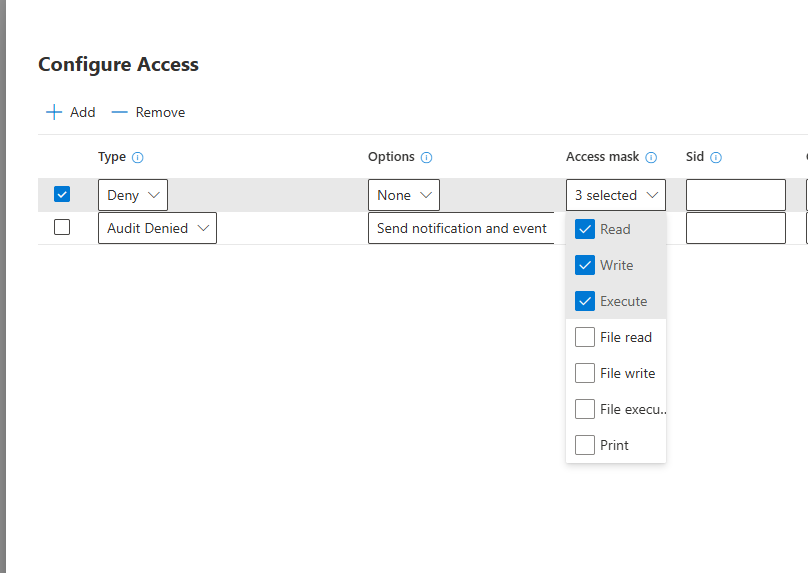
Click Edit instance on the BLOCK rule to open the Configure Access panel. Add two entries:
Entry 1 – Deny
- Type:
Deny - Options:
None - Access mask:
Read,Write,Execute
This is the enforcement entry that blocks access.
Entry 2 – Audit Denied
- Type:
Audit Denied - Options:
Send notification and event - Access mask:
Read,Write,Execute
This entry generates the audit events that appear in the Device Control report and sends the Windows Security notification to the user at the time of the block.
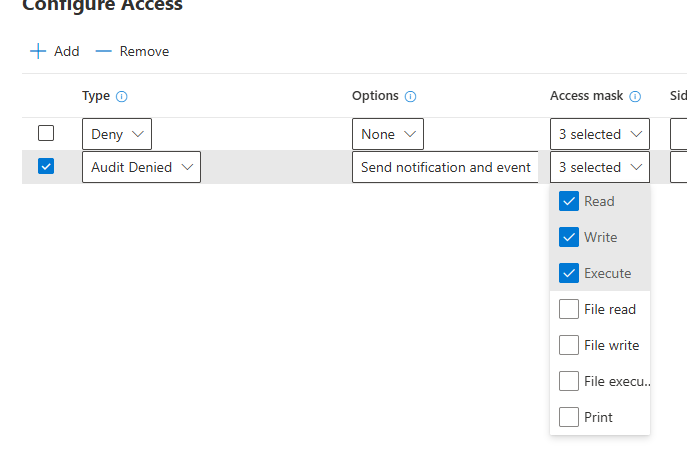
The combination is deliberate. The Deny entry blocks the access; the Audit Denied entry records it and notifies the user. Without the audit entry, blocks are silent – users receive no feedback and you have no events to investigate.
Step 4: Verify the Block is Working
Assign the policy to your device group and wait for it to propagate. When a user inserts a USB drive covered by the policy, they see a Windows Security notification:
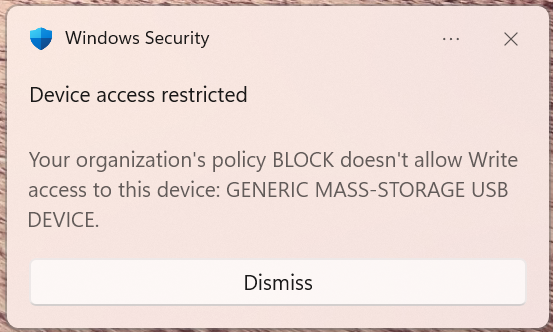
The notification names the policy (BLOCK) and the specific access type that was denied (Write). This is useful context for the user and for the helpdesk when a ticket comes in.
Step 5: Use the Device Control Report to Identify Devices
Navigate to Endpoint security > Attack surface reduction > Reports and open the Device control report. Filter by Policy = BLOCK to see the events generated by your block rule.
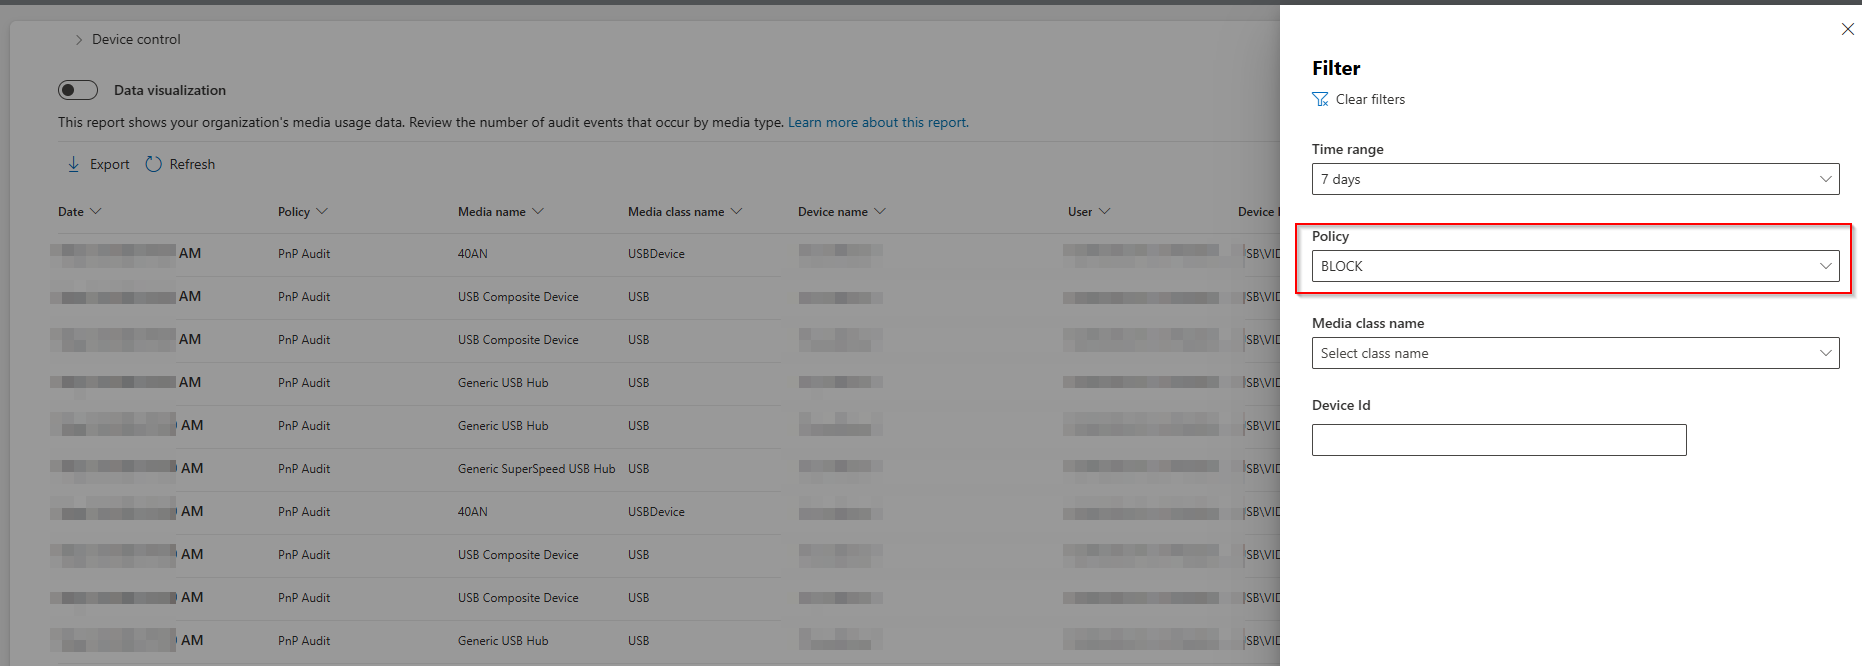
Each row is an audit event recording a device access attempt. The report shows the media name, class, the device the event occurred on, and the user. This is the primary tool for identifying which devices users are trying to use.
Note: The Device Control report can have a delay of up to 6 hours before events appear. If you need to investigate a recent block, check back later or use Advanced Hunting for more immediate results. See Reporting delays in the Microsoft documentation.
Click on any event to open the detailed event view:
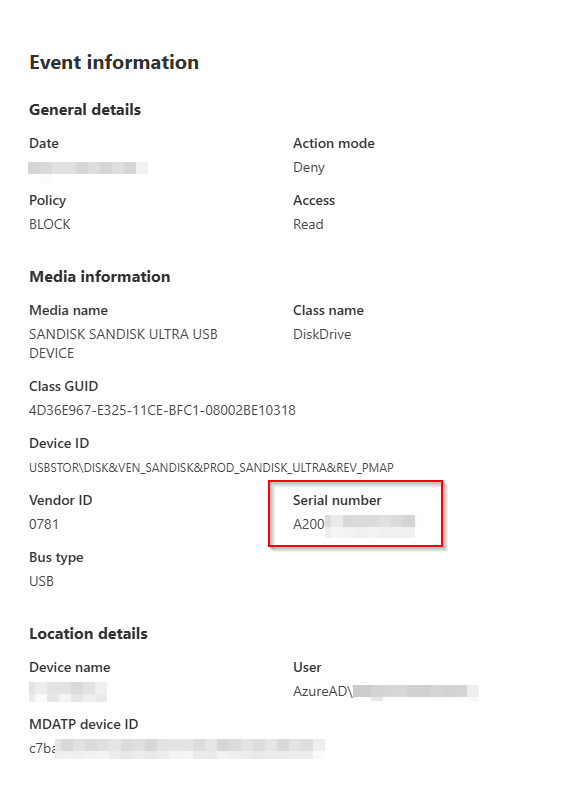
The event details include all the hardware attributes you need to build an allow exception:
- Serial number – the most precise identifier, unique to a single physical device
- Vendor ID – identifies the manufacturer (
0781is SanDisk) - Device ID – the full hardware ID string including vendor, product, and revision
- Media name – the human-readable product name
In this example, the blocked device is a SanDisk Sandisk Ultra with serial number starting with A200.... The serial number is the right identifier for an individual allow exception.
Advanced Hunting as an Alternative Source
The Device Control report works well for browsing individual events, but when you need to extract serial numbers for many devices at once, or want to build a repeatable query you can run on demand, Advanced Hunting in Microsoft Defender XDR is the better tool.
Note: Advanced Hunting is not available in Microsoft Defender for Business. If your environment uses Defender for Business, use the Device Control report as your only event source.
Device control events are stored in the DeviceEvents table under the RemovableStoragePolicyTriggered action type. The following query is the official example from the Microsoft documentation and returns all disk and file system level enforcement events with the full set of hardware attributes:
// RemovableStoragePolicyTriggered: event triggered by Disk and file system level enforcement
// for both Printer and Removable storage based on your policy
DeviceEvents
| where ActionType == "RemovableStoragePolicyTriggered"
| extend parsed=parse_json(AdditionalFields)
| extend RemovableStorageAccess = tostring(parsed.RemovableStorageAccess)
| extend RemovableStoragePolicyVerdict = tostring(parsed.RemovableStoragePolicyVerdict)
| extend MediaBusType = tostring(parsed.BusType)
| extend MediaClassGuid = tostring(parsed.ClassGuid)
| extend MediaClassName = tostring(parsed.ClassName)
| extend MediaDeviceId = tostring(parsed.DeviceId)
| extend MediaInstanceId = tostring(parsed.DeviceInstanceId)
| extend MediaName = tostring(parsed.MediaName)
| extend RemovableStoragePolicy = tostring(parsed.RemovableStoragePolicy)
| extend MediaProductId = tostring(parsed.ProductId)
| extend MediaVendorId = tostring(parsed.VendorId)
| extend MediaSerialNumber = tostring(parsed.SerialNumber)
| project Timestamp, DeviceId, DeviceName, InitiatingProcessAccountName, ActionType,
    RemovableStorageAccess, RemovableStoragePolicyVerdict, MediaBusType, MediaClassGuid,
    MediaClassName, MediaDeviceId, MediaInstanceId, MediaName, RemovableStoragePolicy,
    MediaProductId, MediaVendorId, MediaSerialNumber, FolderPath, FileSize
| order by Timestamp desc
The RemovableStoragePolicyVerdict field tells you whether the event resulted in a block or an allow, and MediaSerialNumber is the value you need when building an allow exception. The result gives you a flat, exportable table across all managed endpoints – far more practical than clicking through individual report rows when you need to onboard multiple devices at once.
Note: Advanced Hunting has a limit of 300
RemovableStoragePolicyTriggeredevents per device per day. If you need to see more events than that, use the Device Control report.
For the full documentation on this query and additional examples, see View device control events and information in Microsoft Defender for Endpoint.
Step 6: Create a Reusable Settings Group for the Allowed Device
Create a new reusable settings group for the device to be allowed. Navigate to Reusable settings and create a group named ReUsable-DevControl-RemovableStorage-ALLOWED-[PI].
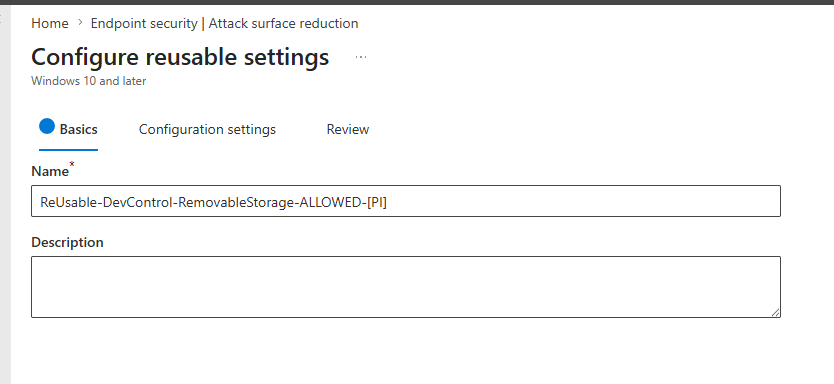
On the Configuration settings tab, add an entry for each device to be allowed. This time, populate the SerialNumberId field with the serial number from the event details. Leave all other identifier fields, including PrimaryId, empty.
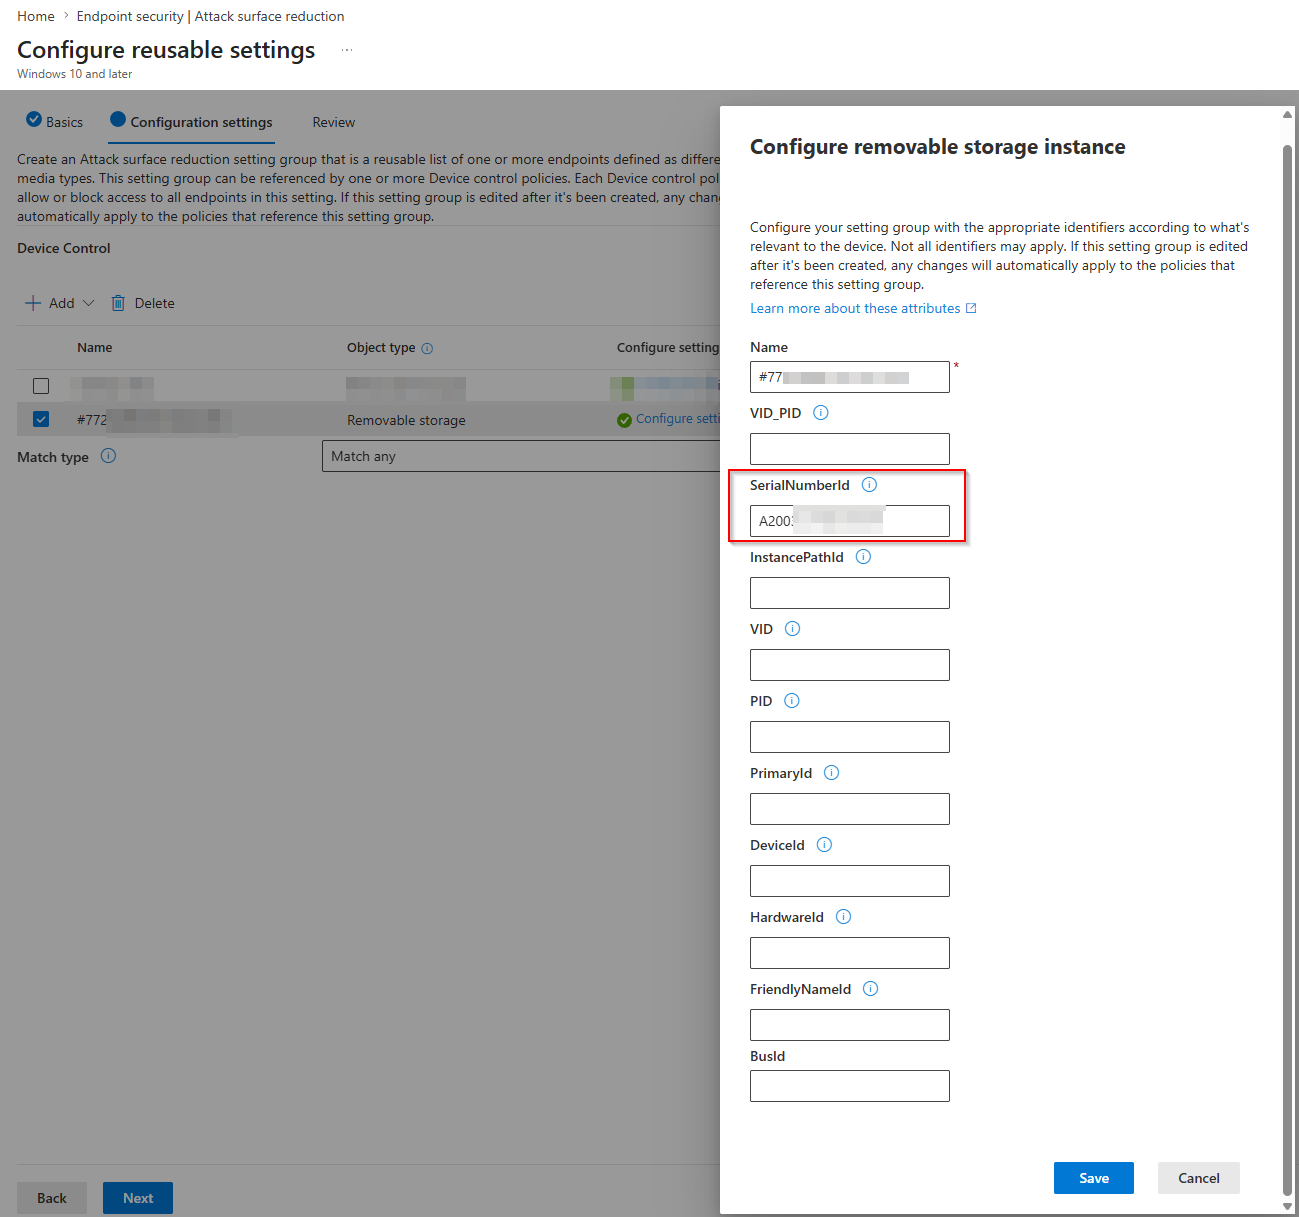
When only SerialNumberId is set, the rule matches exclusively devices with that exact serial number, regardless of vendor or product. This is the most precise scope available and avoids inadvertently allowing other devices from the same manufacturer.
Step 7: Add the Allow Rule to the Policy
Return to the Device Control policy and add a second rule. Name it to identify what is being allowed, for example ALLOW SanDisk Ultra or ALLOW [Username] USB.
For the Included Devices of the ALLOW rule, reference the allowed device reusable settings group. For the Excluded Devices of the BLOCK rule, add the same allowed device group – this prevents the BLOCK rule from firing on the approved device and causing conflicting access entries.
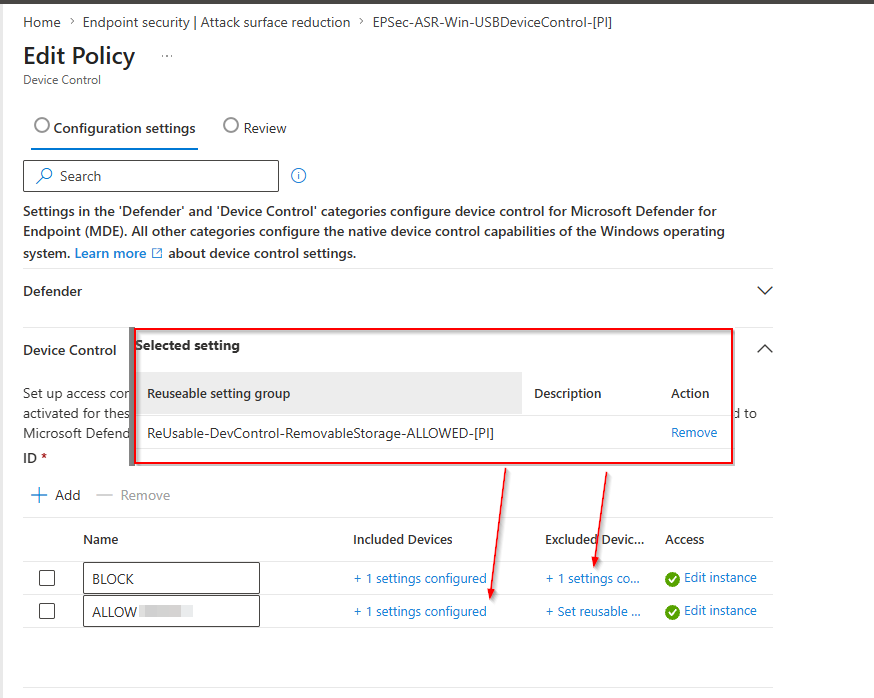
The policy now has two rules:
| Rule | Included Devices | Excluded Devices | Purpose |
|---|---|---|---|
| BLOCK | All removable media group | Allowed device group | Deny and audit all other removable media |
| ALLOW [device] | Allowed device group | (none) | Grant full access to the approved device |
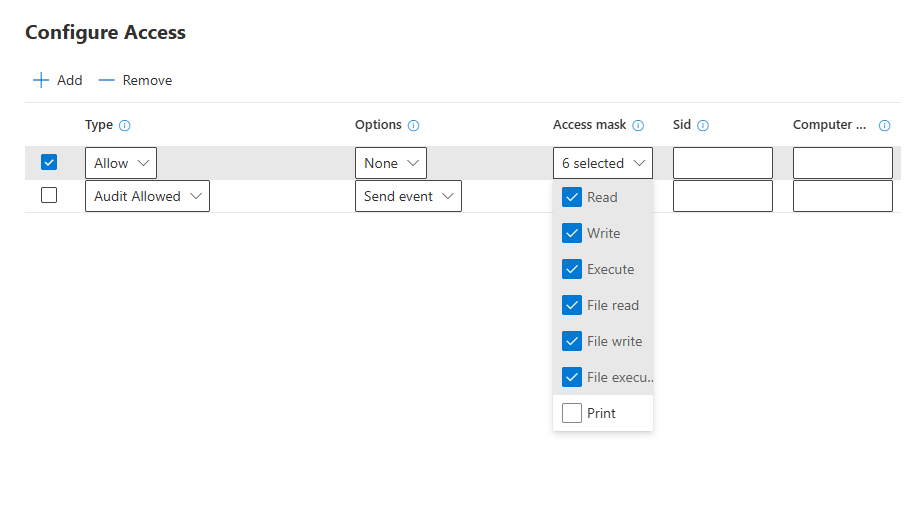
Configure the access entries for the ALLOW rule. Add two entries:
Entry 1 – Allow
- Type:
Allow - Options:
None - Access mask:
Read,Write,Execute,File read,File write,File execute
Entry 2 – Audit Allowed
- Type:
Audit Allowed - Options:
Send event - Access mask:
Read,Write,Execute
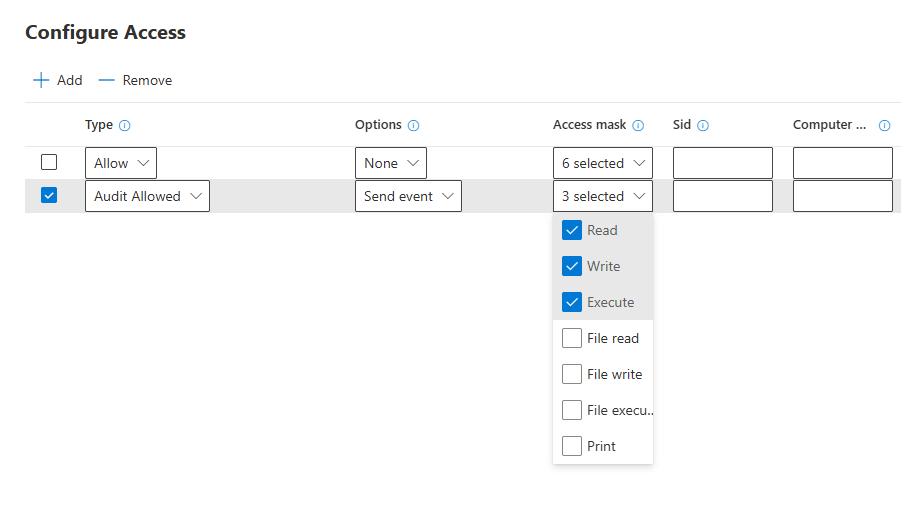
The Audit Allowed entry ensures that even permitted device usage appears in the Device Control report, maintaining a complete audit trail across both blocked and allowed events.
Allowing Printing on Any Printer
Device Control is not limited to removable storage. The same policy framework governs printer devices, which lets you control whether users can print to USB-connected, network, or corporate printers. A common requirement is to keep removable storage locked down while still permitting printing – for example, allowing users to print to any printer rather than maintaining an explicit allow list per device.
The workflow mirrors the removable storage exception: create a reusable settings group that targets the printer device class, then reference it from an ALLOW rule with a Print access mask.
Start by creating a new reusable settings group named ReUsable-DevControl-AllPrinterDevices-ALLOWED-[PI].
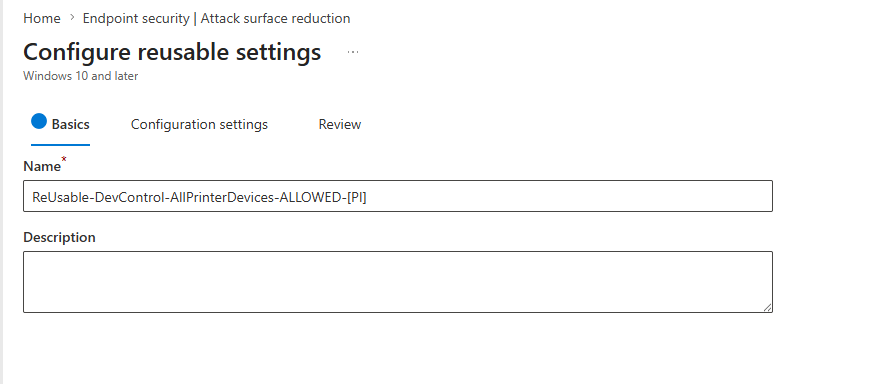
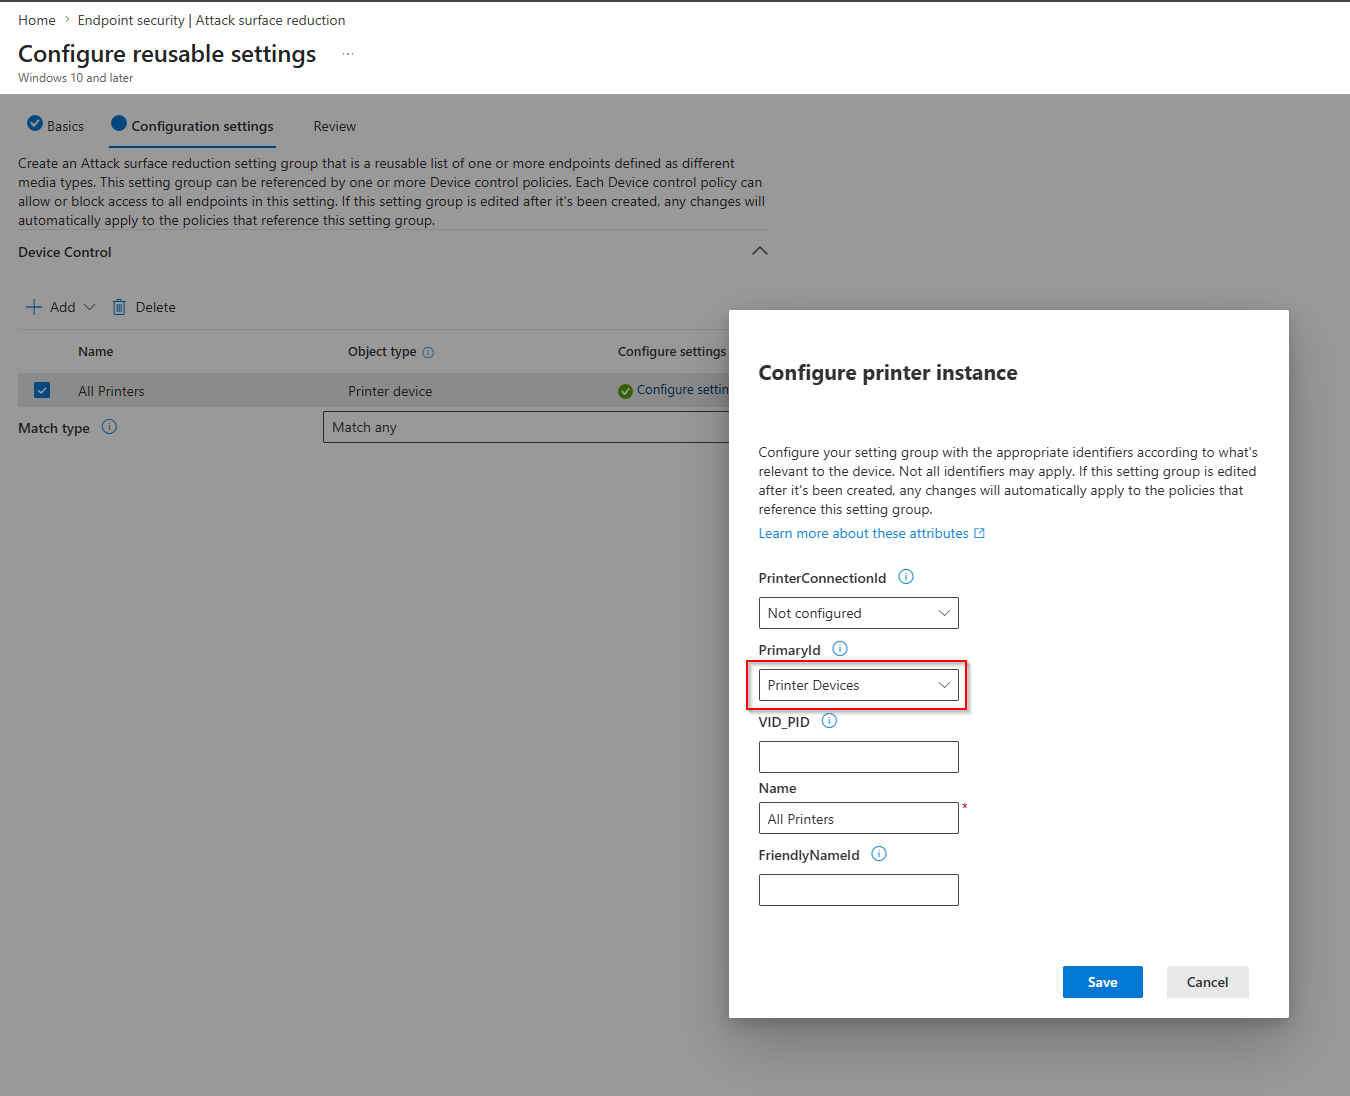
On the Configuration settings tab, add an entry with the Printer device object type. Set PrimaryId to Printer Devices and give the entry a descriptive name such as All Printers. Leave the other identifier fields empty so the rule matches the entire printer class rather than a specific model. To allow only a specific printer, populate VID_PID or PrinterConnectionId instead.
Return to the Device Control policy and add a rule named ALLOW Print. For Included Devices, reference the printer reusable settings group just created. Configure an access entry of type Allow and select Print in the access mask.
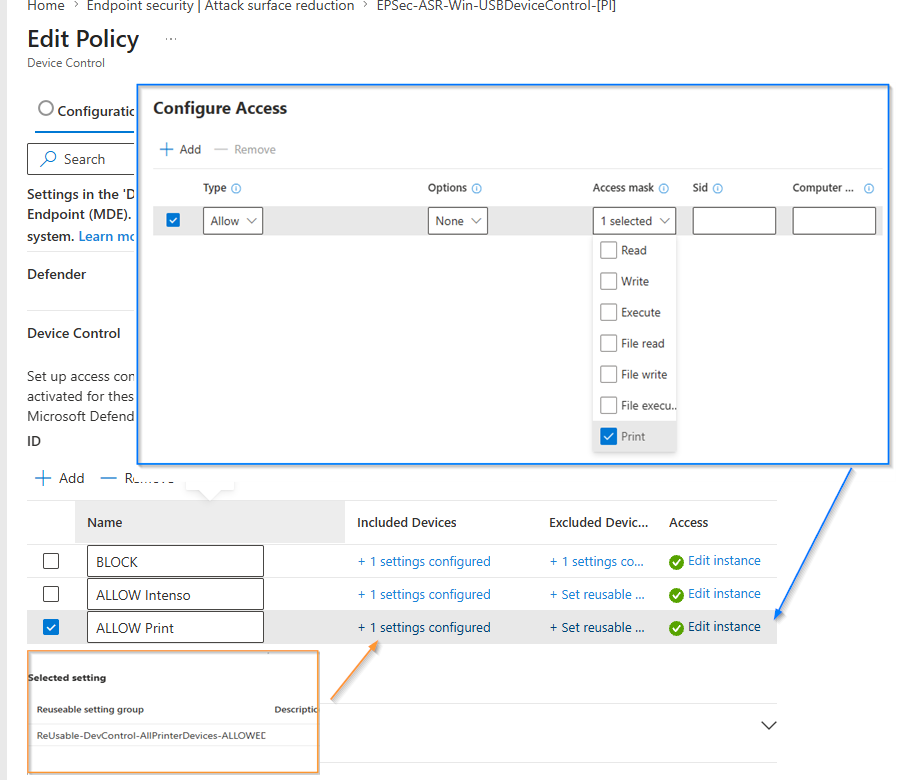
With this rule in place alongside the removable storage rules, printing remains available across the fleet while USB mass storage stays blocked by default. Because printer control shares the same Default Deny enforcement model, remember that printing must be explicitly allowed once Device Control is enabled – otherwise the default deny posture will block it.
Choosing the Right Device Identifier
The identifier you use in the reusable settings group determines how broad or narrow the allow exception is:
| Identifier | Scope | When to use |
|---|---|---|
SerialNumberId |
One specific physical device | Allowing a named individual’s device |
VID_PID |
All devices of a given model from a vendor | Approving a standard corporate USB model |
VID |
All devices from a vendor | Allowing an entire vendor’s product range |
PrimaryId |
An entire device class | Allowing all removable media (used in the block group here) |
DeviceId |
Full hardware ID string | Precise match including revision |
Start with SerialNumberId for individual exceptions. Expand to VID_PID or VID only when managing individual serials becomes operationally impractical – and document the rationale for the broader scope, since widening the scope increases risk.
Troubleshooting
If a policy does not appear to be taking effect on an endpoint, two PowerShell commands run as administrator help narrow down whether the issue is with policy delivery or policy application.
To check when the device control policy was last received and applied by Defender:
Get-MpComputerStatus | Select-Object DeviceControlPoliciesLastUpdated
This returns the timestamp of the last successful policy update. If the value is stale or absent, the device has not received or applied the policy – check Defender health, onboarding status, and Intune sync.
To inspect the locally cached policy package that Defender is currently enforcing:
Get-ItemProperty "HKLM:\SOFTWARE\Microsoft\Windows Defender\Device Control" `
    -Name "LastKnownValidPolicyPackage" -ErrorAction SilentlyContinue |
    Select-Object -ExpandProperty LastKnownValidPolicyPackage
This returns the XML content of the policy as Defender last evaluated it. If the value is empty, Defender has not yet received a valid policy. If it is present, you can inspect the XML to confirm that your rules and device groups are included as expected – useful for verifying that a reusable settings group change has actually propagated.
What’s Next
With a block-all baseline in place and a tested allow exception workflow, you have the foundation for a sustainable USB device control program:
- Add devices to the allowed reusable group as they are vetted and approved; the change propagates automatically to the policy
- Use the Device Control report as an ongoing audit mechanism, not just for initial setup
- Consider a read-only variant: for users who need to read from USB but should not write, create a separate allow rule with only
ReadandFile readin the access mask - Use the SID field in access entries to scope rules to specific users or Entra ID groups. This allows scenarios like granting IT administrators unrestricted USB access while the block remains in place for everyone else – without maintaining separate policies per group. The SID of an Entra ID user or group can be retrieved via the Azure portal or with
Get-MgGroup/Get-MgUserfrom the Microsoft Graph PowerShell module.
Microsoft Documentation
- Device Control overview
- Deploy and manage Device Control with Microsoft Intune
- Device control walkthroughs
- Device Control report in Microsoft Defender for Endpoint
- Microsoft Device Control samples on GitHub – contains policy examples and templates from Microsoft; note that some samples may be outdated