In my previous article I covered USB device control for Windows via Microsoft Intune. The macOS counterpart follows the same conceptual model – device groups, enforcement rules, and a default-deny posture – but the technical implementation is entirely different.
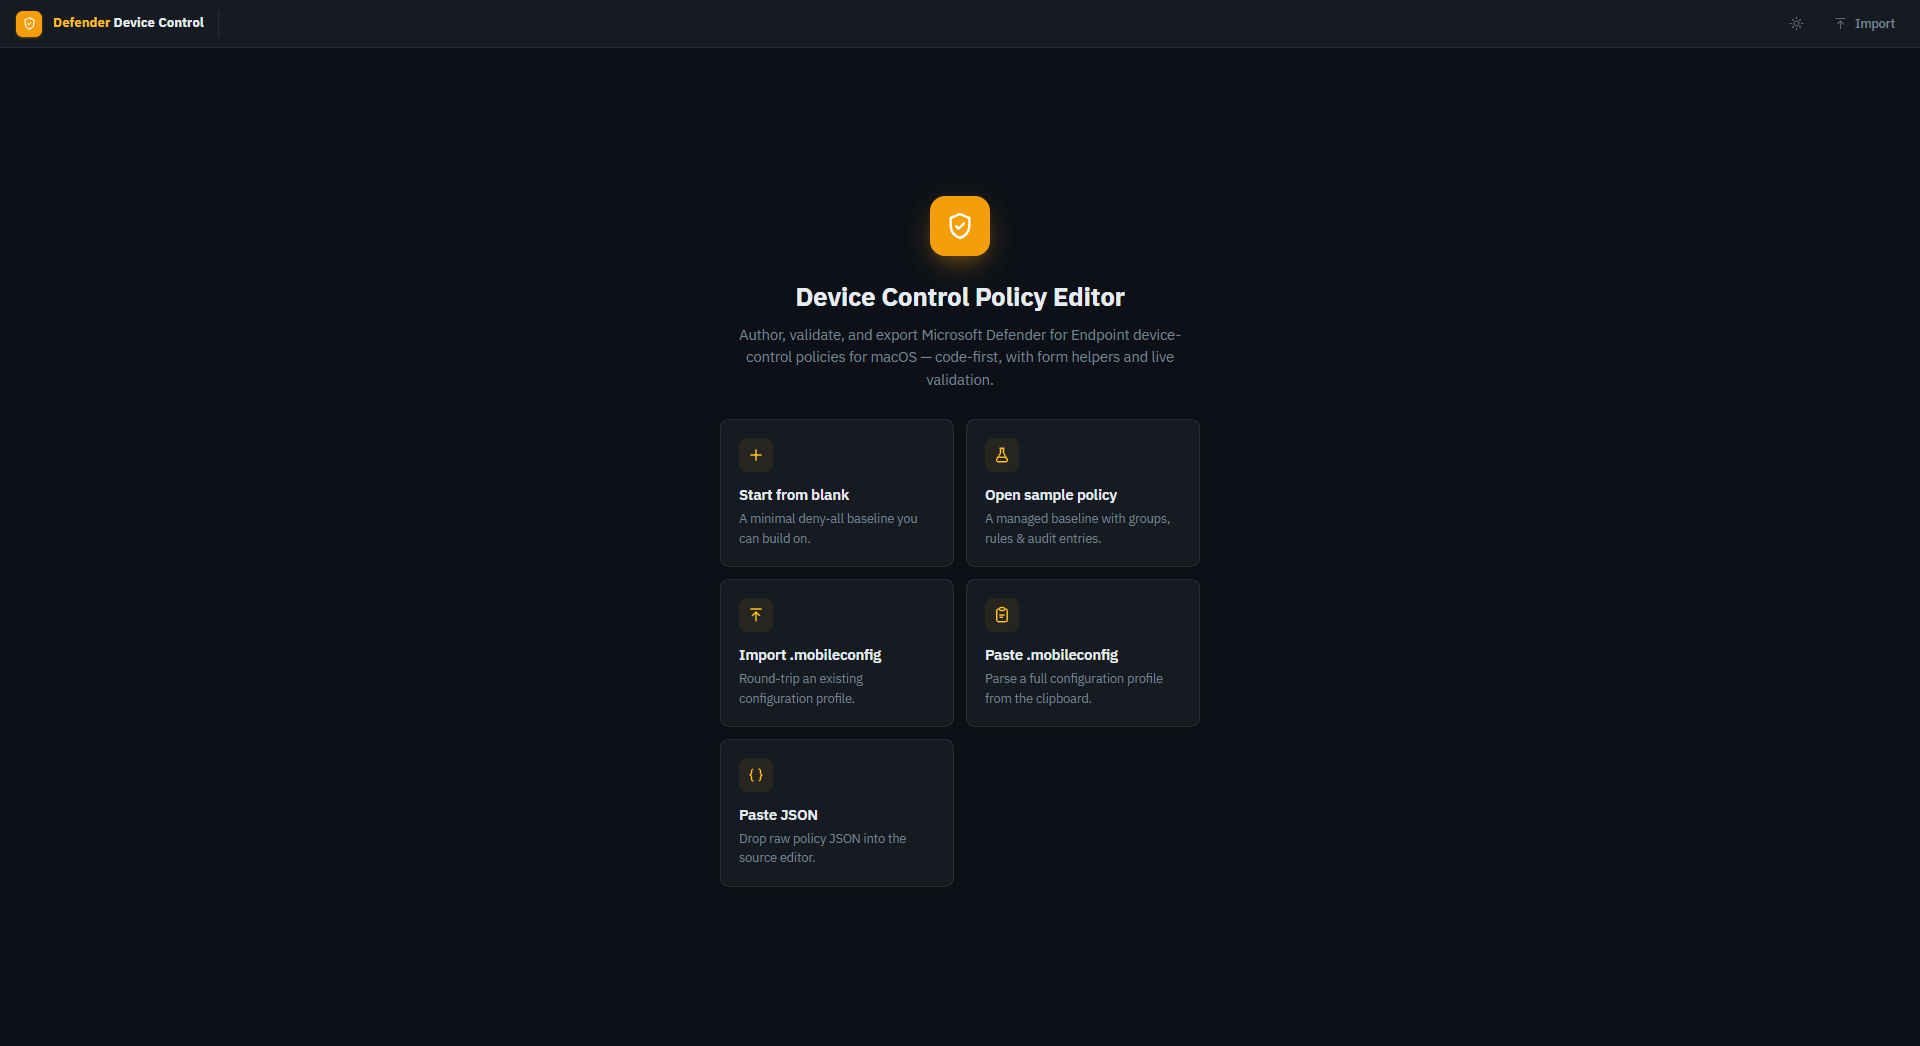
On Windows the policy is XML delivered through OMA-URI. On macOS the policy is JSON, but it gets embedded inside an Apple Configuration Profile (.mobileconfig), which is itself an XML plist. Editing JSON inside an XML file by hand is extremely tedious and error-prone. To make this manageable I built a browser-based editor (with some help from Claude) that lets you author, validate, and export device control policies through a proper UI.
The editor is available at macdevicecontrol.sastu-insights.com and can also run locally or be self-hosted as a static web app. It is completely stateless – no data is ever saved or transmitted. The source is on GitHub. Not all policy options have been fully tested yet; if you run into issues or need additional features, please open an issue on GitHub.
Prerequisites
- macOS device enrolled in Microsoft Intune
- Device onboarded to Microsoft Defender for Endpoint (MDE)
- Intune role with permissions to create and assign configuration profiles
Understanding the Policy Structure
A macOS device control policy has three building blocks:
| Part | Description |
|---|---|
| Device Groups | Reusable matchers that identify devices by family, vendor ID, product ID, serial number, or encryption type |
| Enforcement Rules | Ordered list of rules that reference groups and define Allow / Deny / Audit behavior for each access type (read, write, execute) |
| Settings | Global default enforcement and per-device-family enable/disable toggles |
Rules are evaluated top-to-bottom; the first matching rule wins. Any device not matched by a rule falls through to the global default enforcement setting.
Creating the Block-All Baseline
Open the Policy Editor
Navigate to macdevicecontrol.sastu-insights.com.
Click Open sample policy to load a managed baseline that already has groups, rules, and audit entries in place. Starting from the sample is far easier than building from scratch – you just remove what you do not need.
Explore the Sample Policy
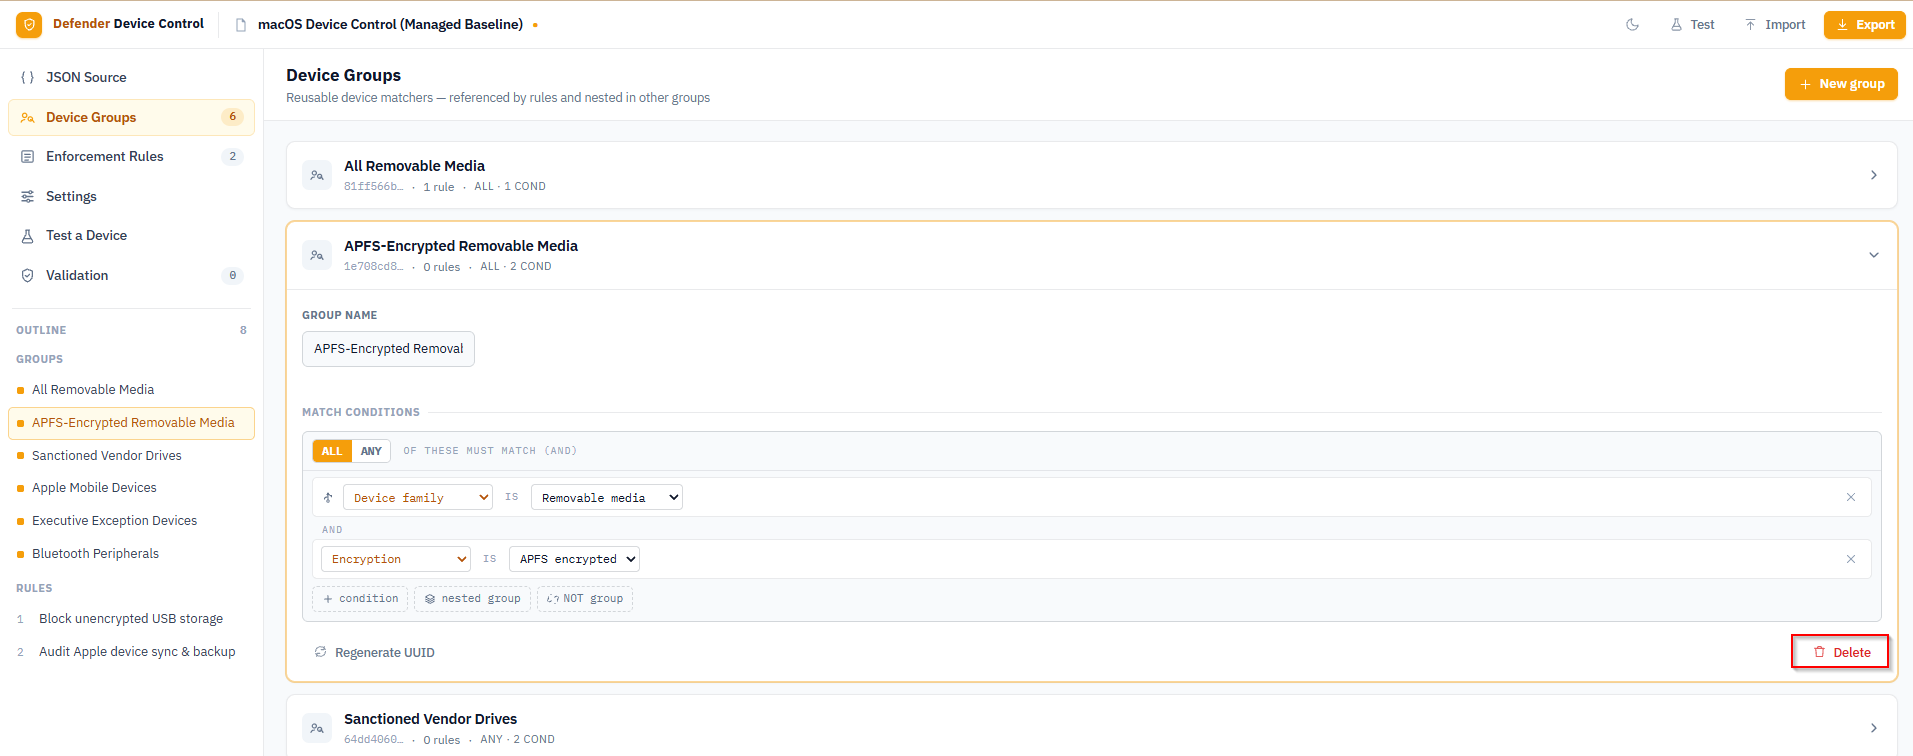
The sample contains four enforcement rules.
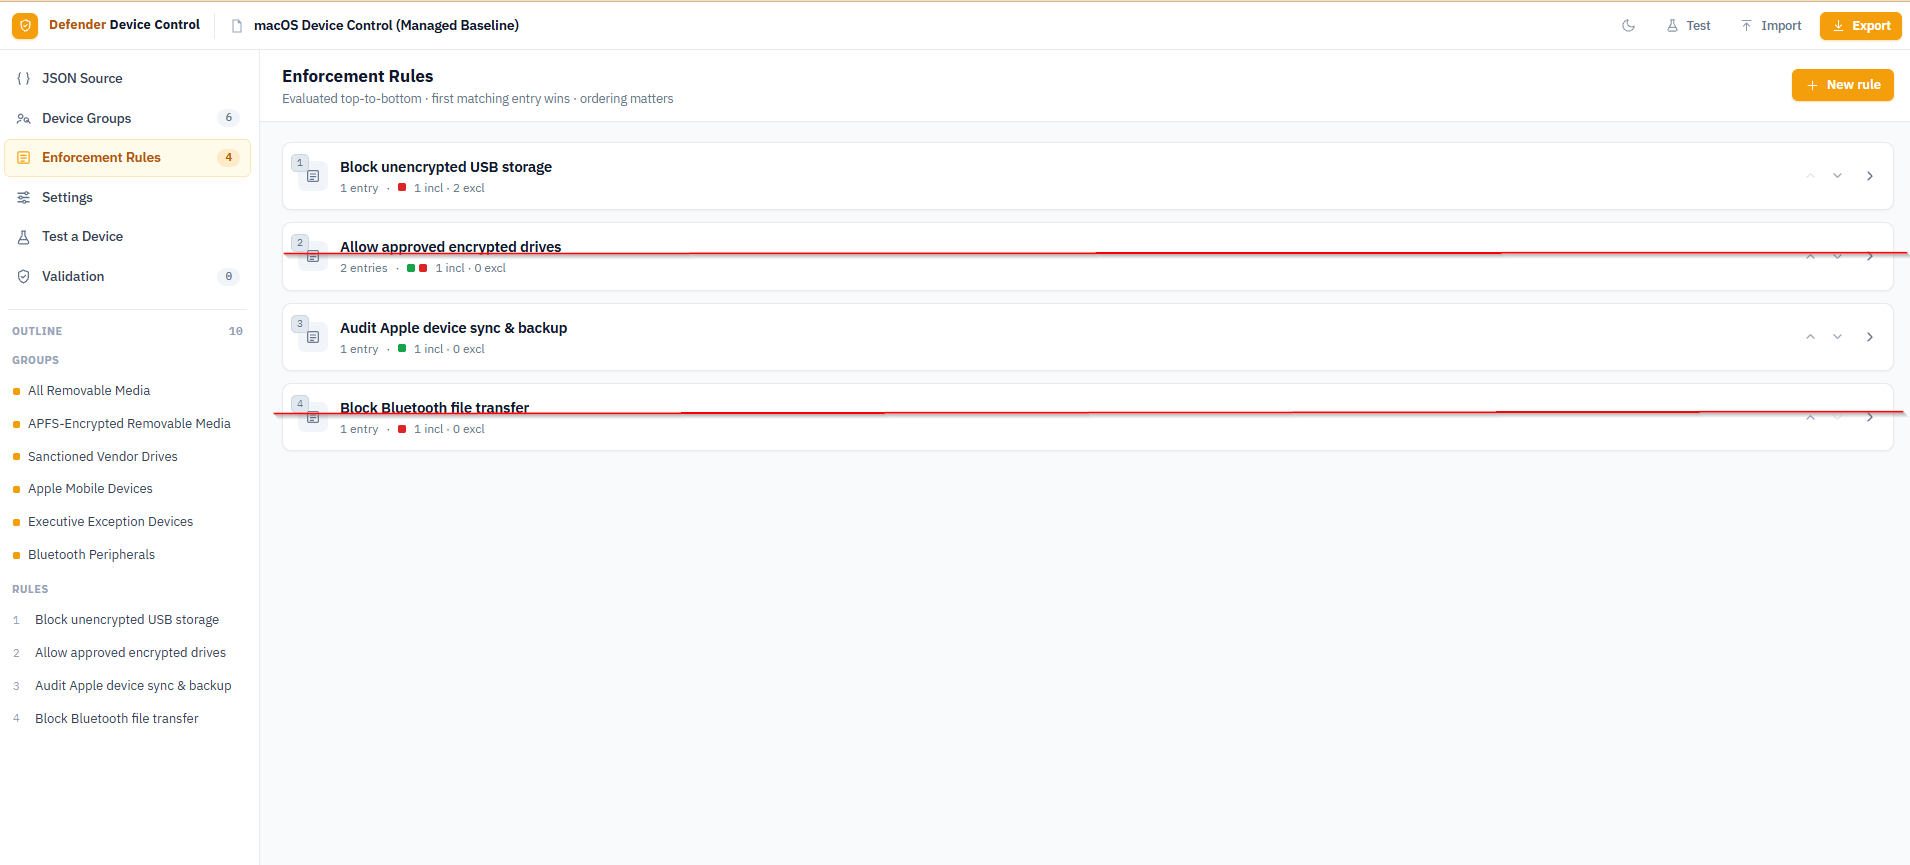
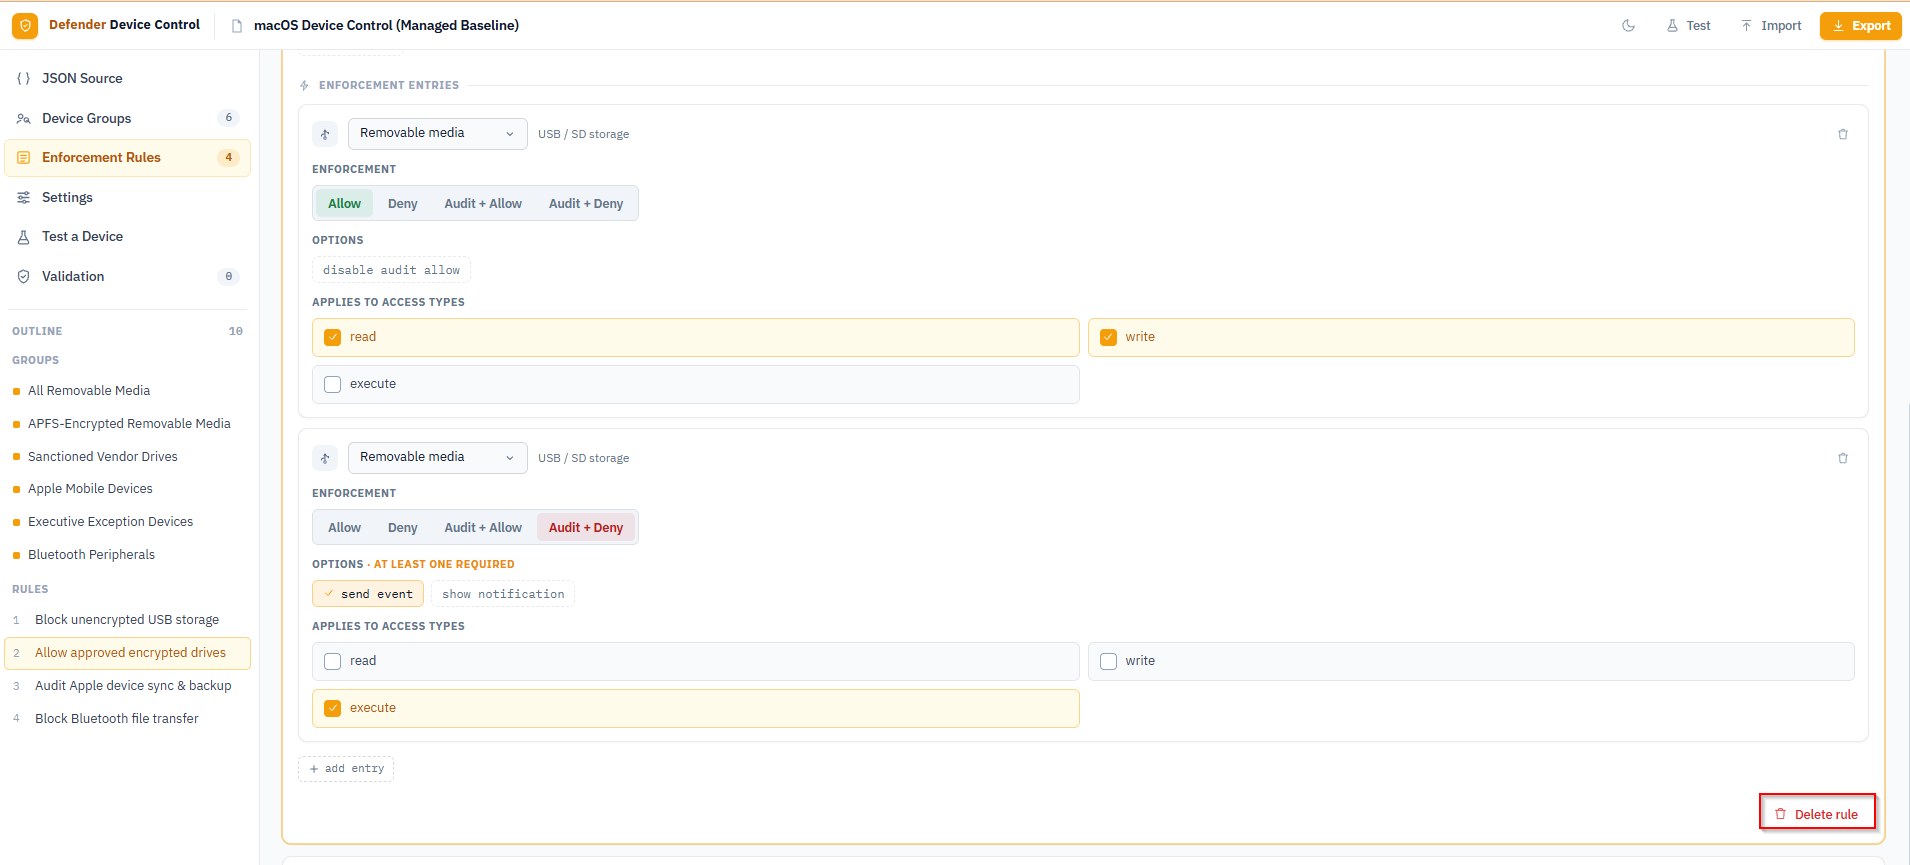
Click into Allow approved encrypted drives to see how a rule is built. Each rule can have multiple enforcement entries, each targeting a device family and access type combination. This rule will be deleted when trimming the policy down to a block-all baseline.
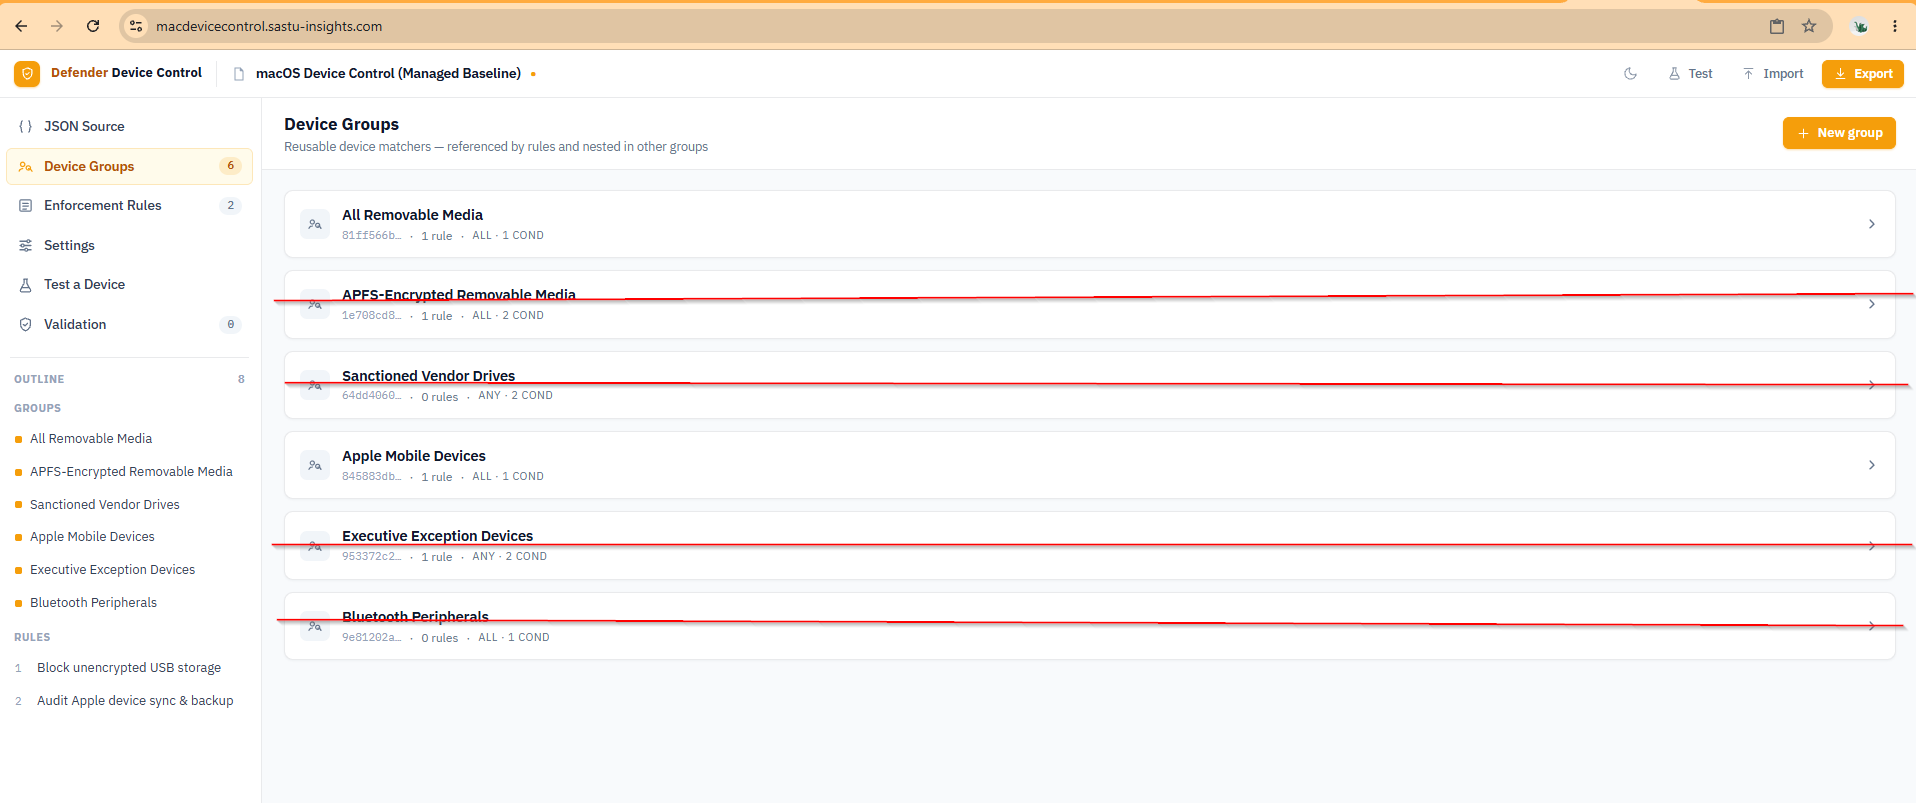
Switch to Device Groups to see the six groups included in the sample. The groups marked with a red line – APFS-Encrypted Removable Media, Sanctioned Vendor Drives, Executive Exception Devices, and Bluetooth Peripherals – are not needed for the block-all baseline and will be deleted. Note that a group can only be deleted once it is no longer referenced by any rule, so delete the rules that use these groups first.
Click into a group to inspect its match conditions. The APFS-Encrypted Removable Media group matches drives that are both in the removable media family and APFS-encrypted – a macOS-specific distinction that lets you allow encrypted drives while blocking unencrypted ones. Like the other marked groups, this one will be deleted when trimming down to a block-all baseline.
Trim Down to a Block-All Policy
For a baseline block-all policy you only need:
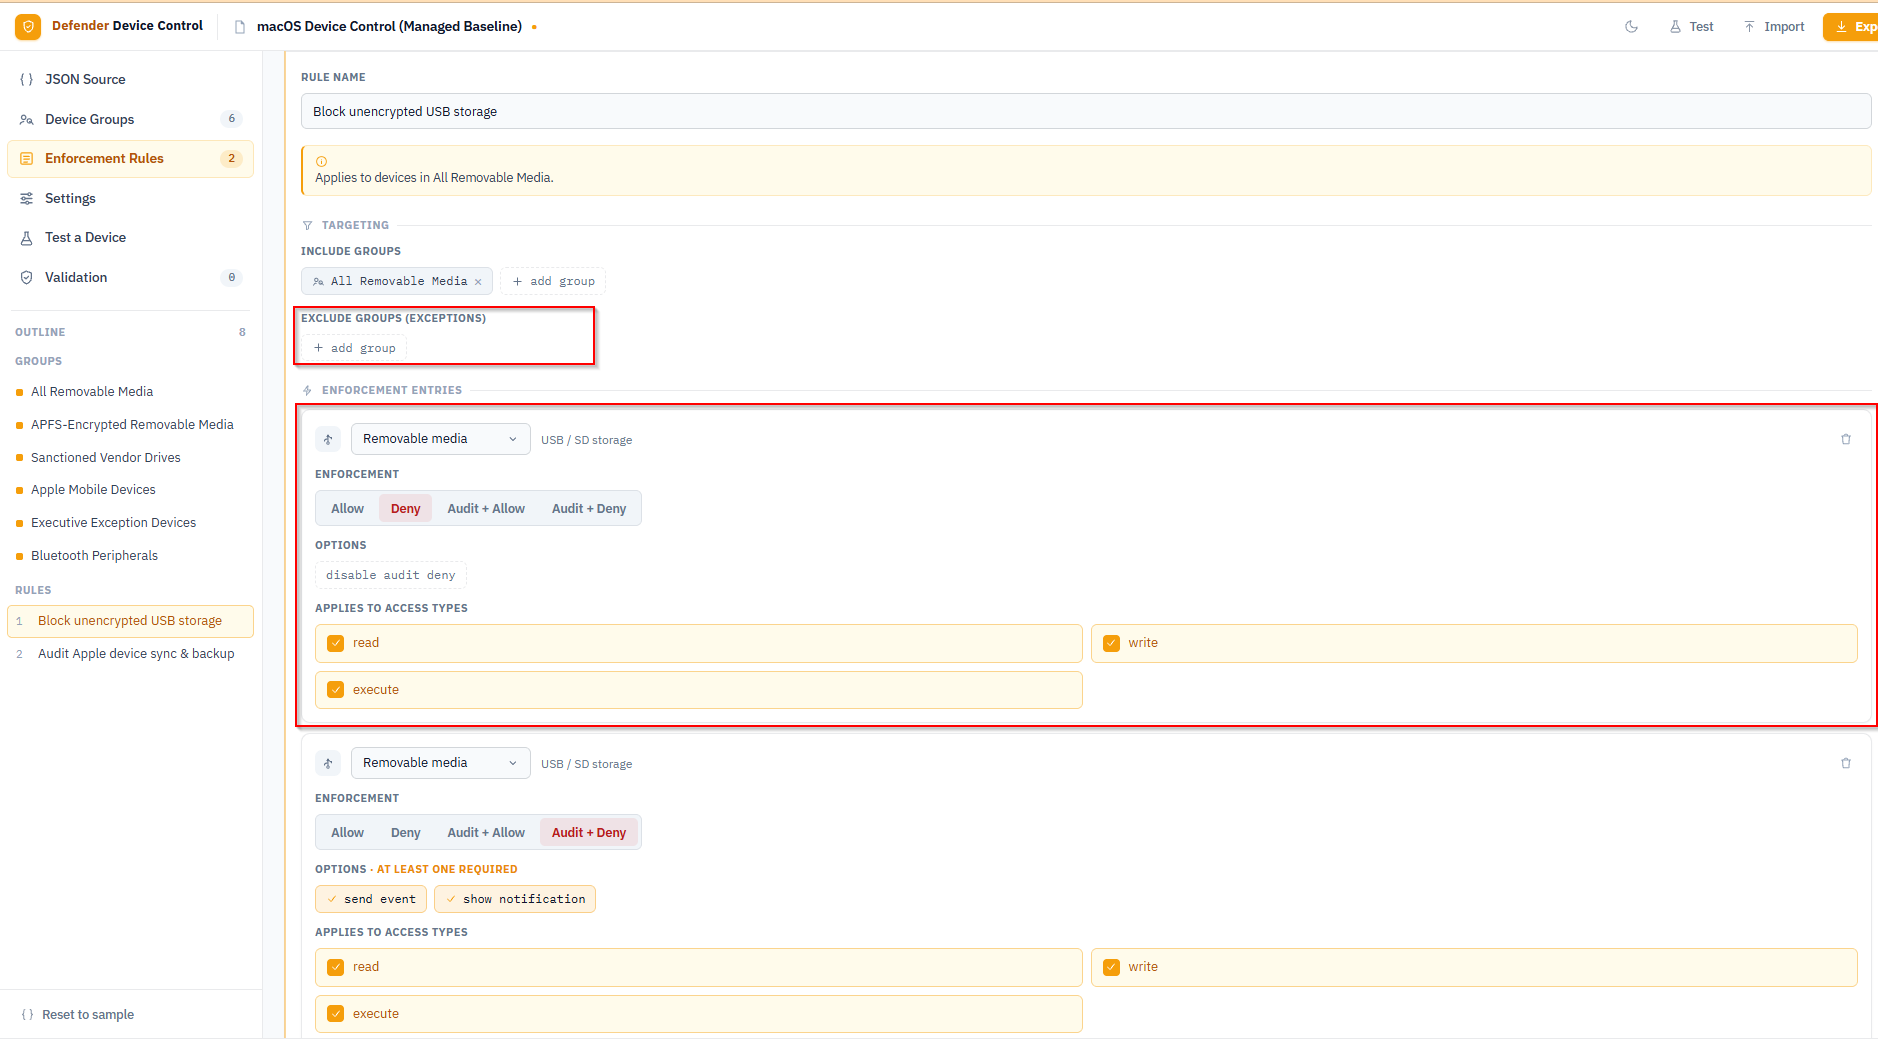
- The Block unencrypted USB storage rule targeting all removable media with Deny enforcement
- The Audit Apple device sync and backup rule to keep visibility on iPhone/iPad connections without blocking them
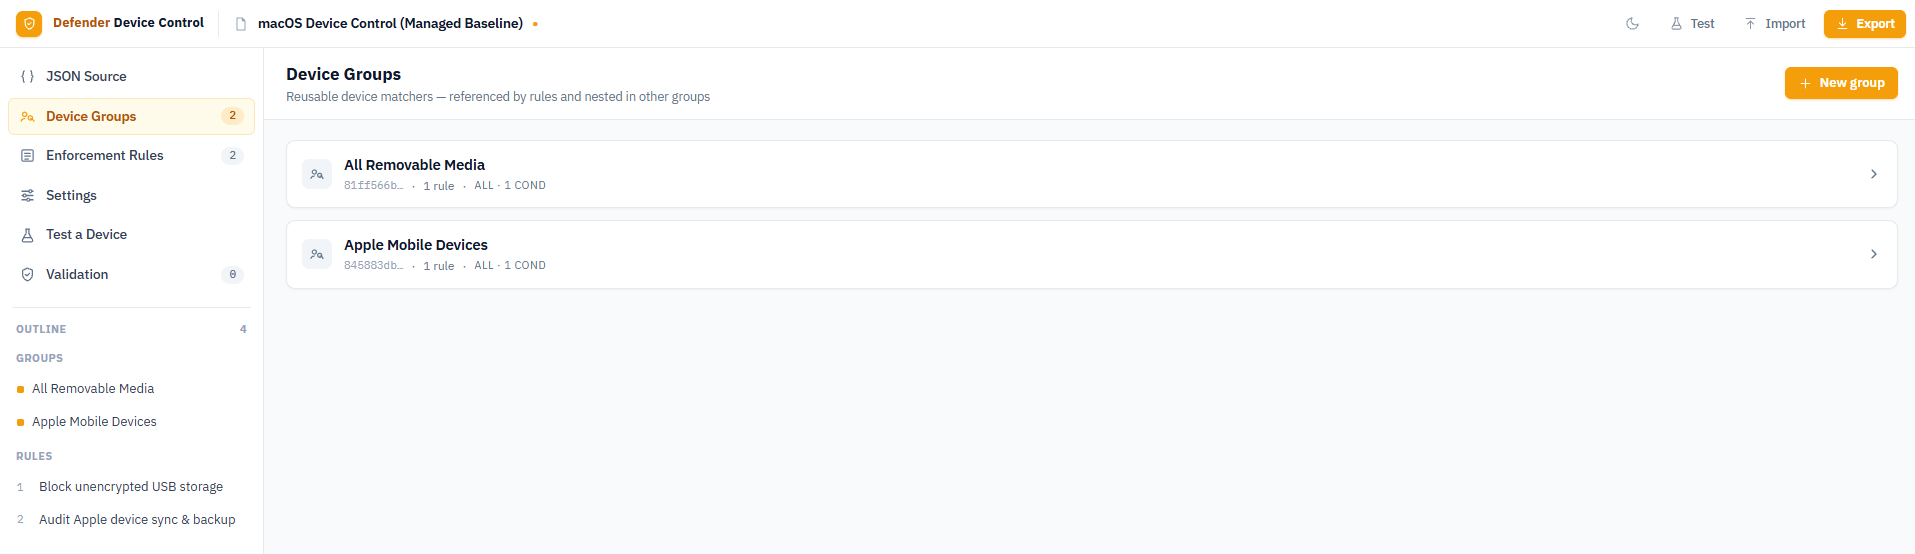
- Their two supporting groups: All Removable Media and Apple Mobile Devices
Delete the Allow approved encrypted drives, Block Bluetooth file transfer, and any other rules you do not need. The editor updates the outline in the sidebar as you remove items.
After removing the unwanted rules, open the Block unencrypted USB storage rule and clear all exclusion groups from the Exclude Groups section, leaving it empty. Set the enforcement entry to Deny with disable audit deny and apply it to read, write, and execute access. Add a second entry with Audit + Deny with send event and show notification for the same access types – this entry generates the report events and shows the on-screen notification when a device is blocked.
Delete the four groups you no longer reference – APFS-Encrypted Removable Media, Sanctioned Vendor Drives, Executive Exception Devices, and Bluetooth Peripherals – leaving only All Removable Media and Apple Mobile Devices.
Configure Policy Settings
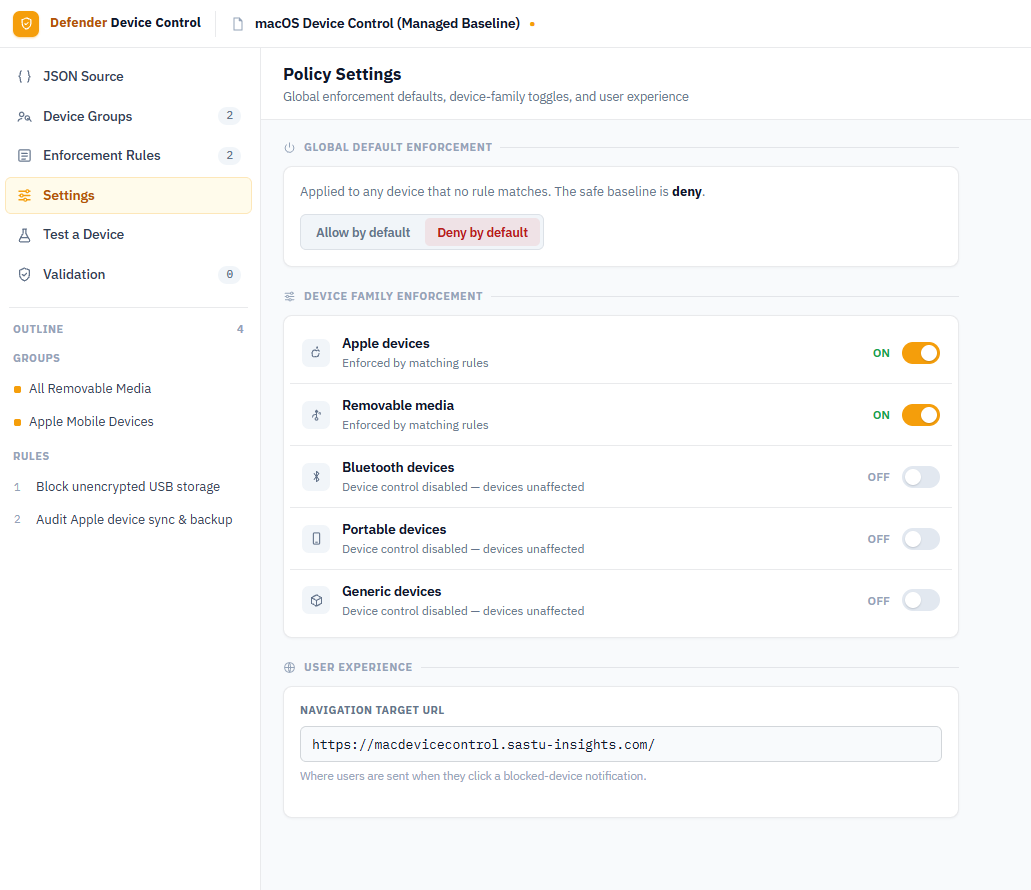
Open Settings and confirm:
- Global Default Enforcement is set to Deny by default – this is the safety net for any device not matched by a rule
- Apple devices and Removable media device family toggles are ON
- All other families (Bluetooth, Portable, Generic) remain OFF unless you need them
Optionally set the Navigation Target URL to a help page. When a user clicks Learn more on the block notification, this is where they are sent.
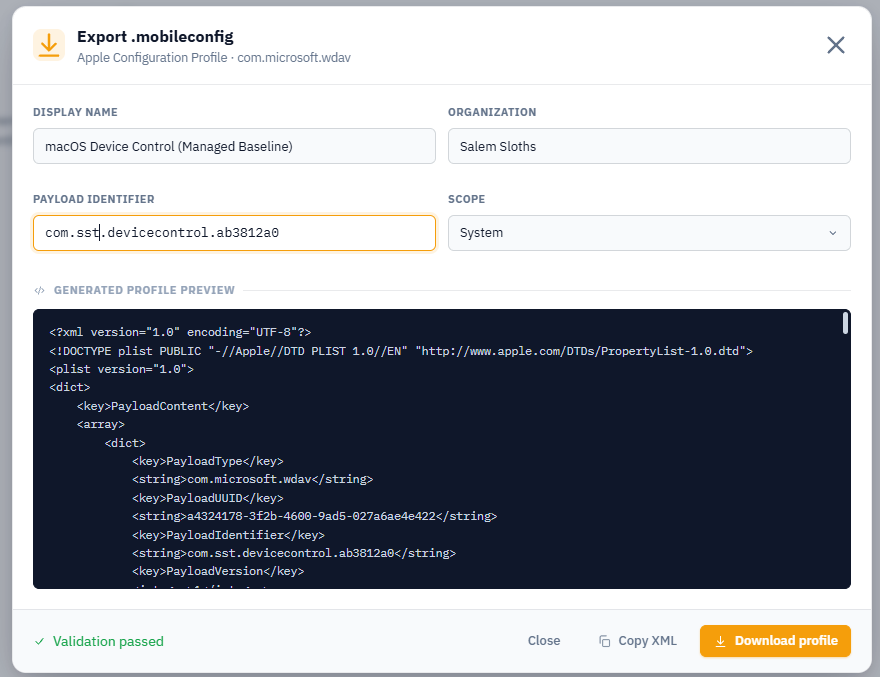
Export the .mobileconfig
Click Export in the top-right corner. Fill in a display name, your organization name, and a payload identifier, then click Download profile. The editor validates the policy before generating the file and will block the export if there are configuration errors.
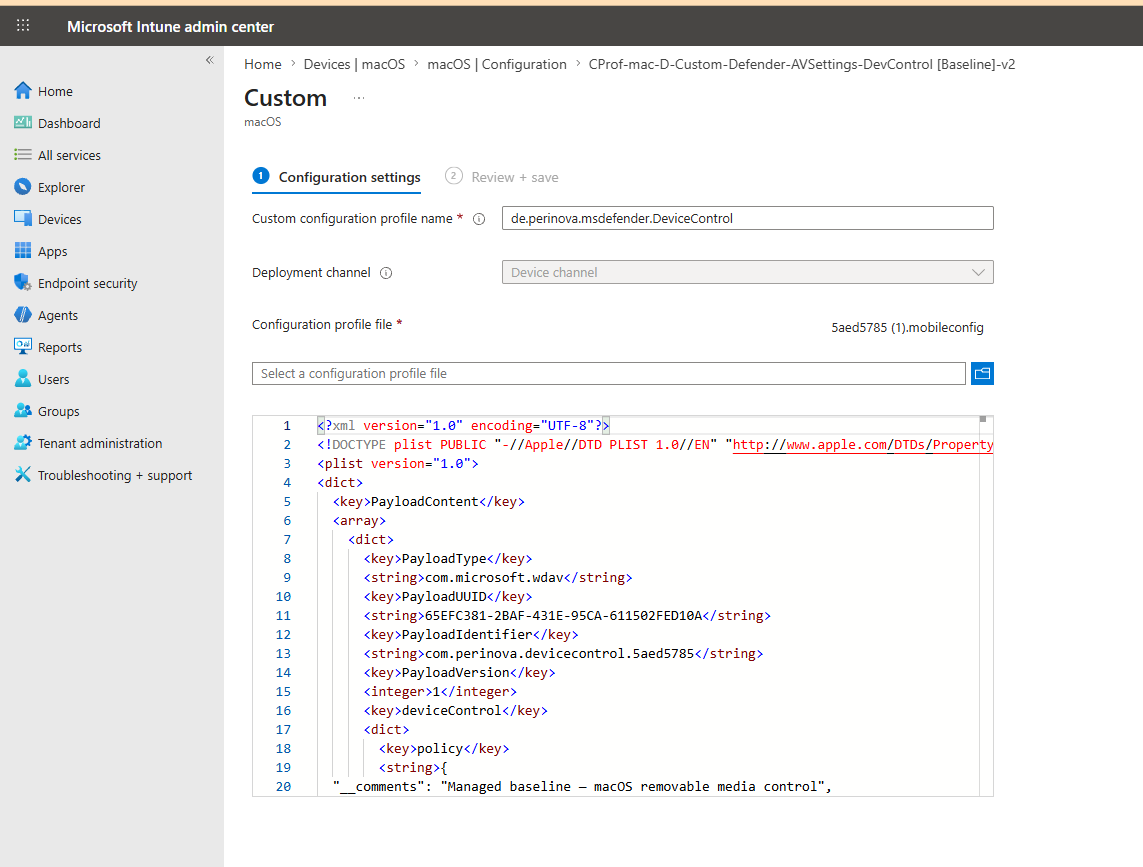
Deploying the Policy via Intune
In the Intune admin center, go to Devices > macOS > Configuration and create a new Custom profile. Set the deployment channel to Device channel, upload the .mobileconfig file you just exported, and assign it to your target group.
Wait for the policy to sync to the device. On a managed Mac you can trigger an immediate sync with sudo mdmclient ManageSoftwareUpdate or just wait for the next check-in cycle.
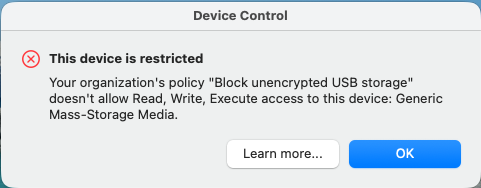
Verifying the Block
Plug in a USB drive on the target Mac. If the policy has applied, MDE will block access immediately and display a native macOS notification.
Finding the Device Details in the Report
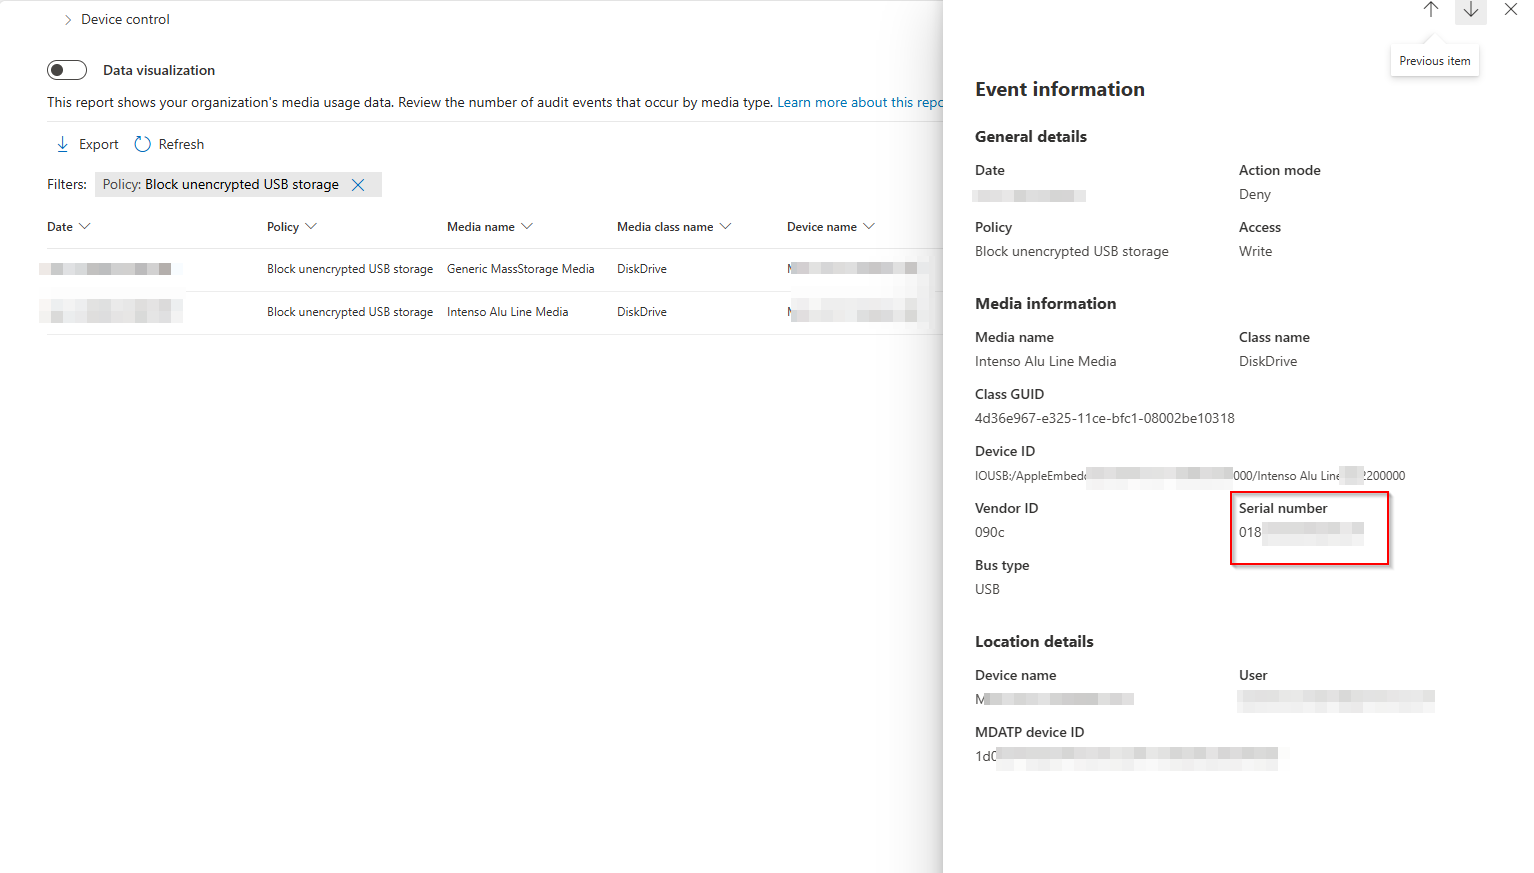
Device Control Report
To identify the blocked device so you can create an exception for it, open the Device control report in the Microsoft Defender portal or the Intune admin center under Reports > Endpoint security > Device control.
Note: The Device Control report can have a delay of up to 6 hours before events appear.
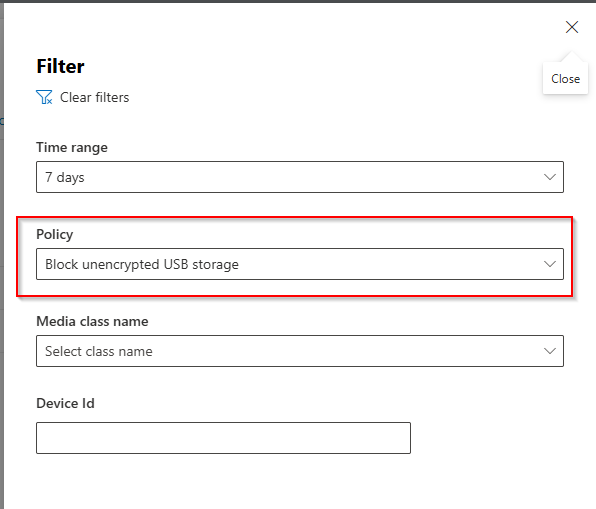
Filter by the policy name to narrow down the results.
Click a report entry to open the event details pane. This shows the Media name, Class name, Vendor ID, Serial number, Bus type, and the user and device it happened on.
Note the Serial number – you will use it in the next step to build an allow exception.
Advanced Hunting
Advanced Hunting is an alternative way to query device control events and can surface device identifiers immediately without waiting for the report to populate. Use the DeviceEvents table and filter on the RemovableStoragePolicyTriggered action type.
Licensing note: Advanced Hunting is not available in Microsoft Defender for Business. It requires a Microsoft Defender for Endpoint Plan 2 or Microsoft 365 Defender license.
Advanced Hunting has a limit of 300
RemovableStoragePolicyTriggeredevents per device per day. For higher-volume environments the Device Control report is the more complete source.
DeviceEvents
| where ActionType == "RemovableStoragePolicyTriggered"
| extend parsed=parse_json(AdditionalFields)
| extend RemovableStorageAccess = tostring(parsed.RemovableStorageAccess)
| extend RemovableStoragePolicyVerdict = tostring(parsed.RemovableStoragePolicyVerdict)
| extend MediaBusType = tostring(parsed.MediaBusType)
| extend MediaClassGuid = tostring(parsed.MediaClassGuid)
| extend MediaClassName = tostring(parsed.MediaClassName)
| extend MediaDeviceId = tostring(parsed.MediaDeviceId)
| extend MediaInstanceId = tostring(parsed.MediaInstanceId)
| extend MediaName = tostring(parsed.MediaName)
| extend RemovableStoragePolicy = tostring(parsed.RemovableStoragePolicy)
| extend MediaProductId = tostring(parsed.MediaProductId)
| extend MediaVendorId = tostring(parsed.MediaVendorId)
| extend MediaSerialNumber = tostring(parsed.MediaSerialNumber)
| project Timestamp, DeviceId, DeviceName, InitiatingProcessAccountName,
    ActionType, RemovableStorageAccess, RemovableStoragePolicyVerdict,
    MediaBusType, MediaClassGuid, MediaClassName, MediaDeviceId,
    MediaInstanceId, MediaName, RemovableStoragePolicy,
    MediaProductId, MediaVendorId, MediaSerialNumber
| order by Timestamp desc
The MediaSerialNumber field maps directly to the serial number you need for the group condition in the policy editor. The RemovableStoragePolicyVerdict field shows whether the event resulted in a block or an allow.
Creating an Allow Exception by Serial Number
With the serial number in hand, go back to the policy editor. If you do not still have the policy open, export the existing profile from Intune and use Import .mobileconfig to load it back into the editor.
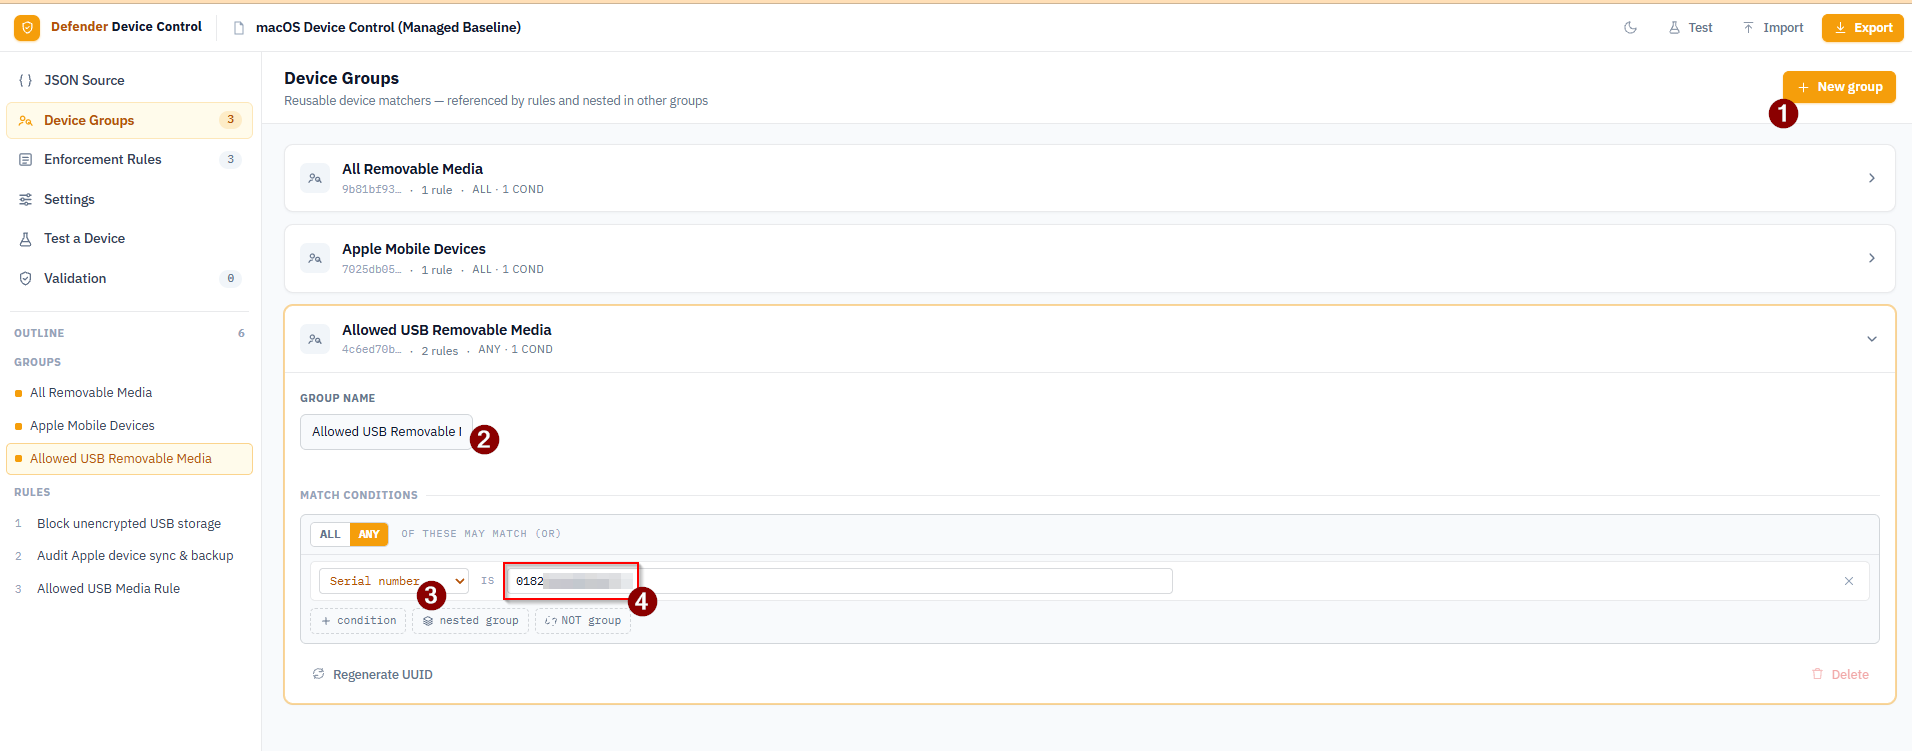
Add a New Device Group
- In Device Groups, click + New group and name it Allowed USB Removable Media
- Set the match mode to ANY
- Add a condition: Serial number IS and paste in the serial number from the report
Update the Block Rule to Exclude the New Group
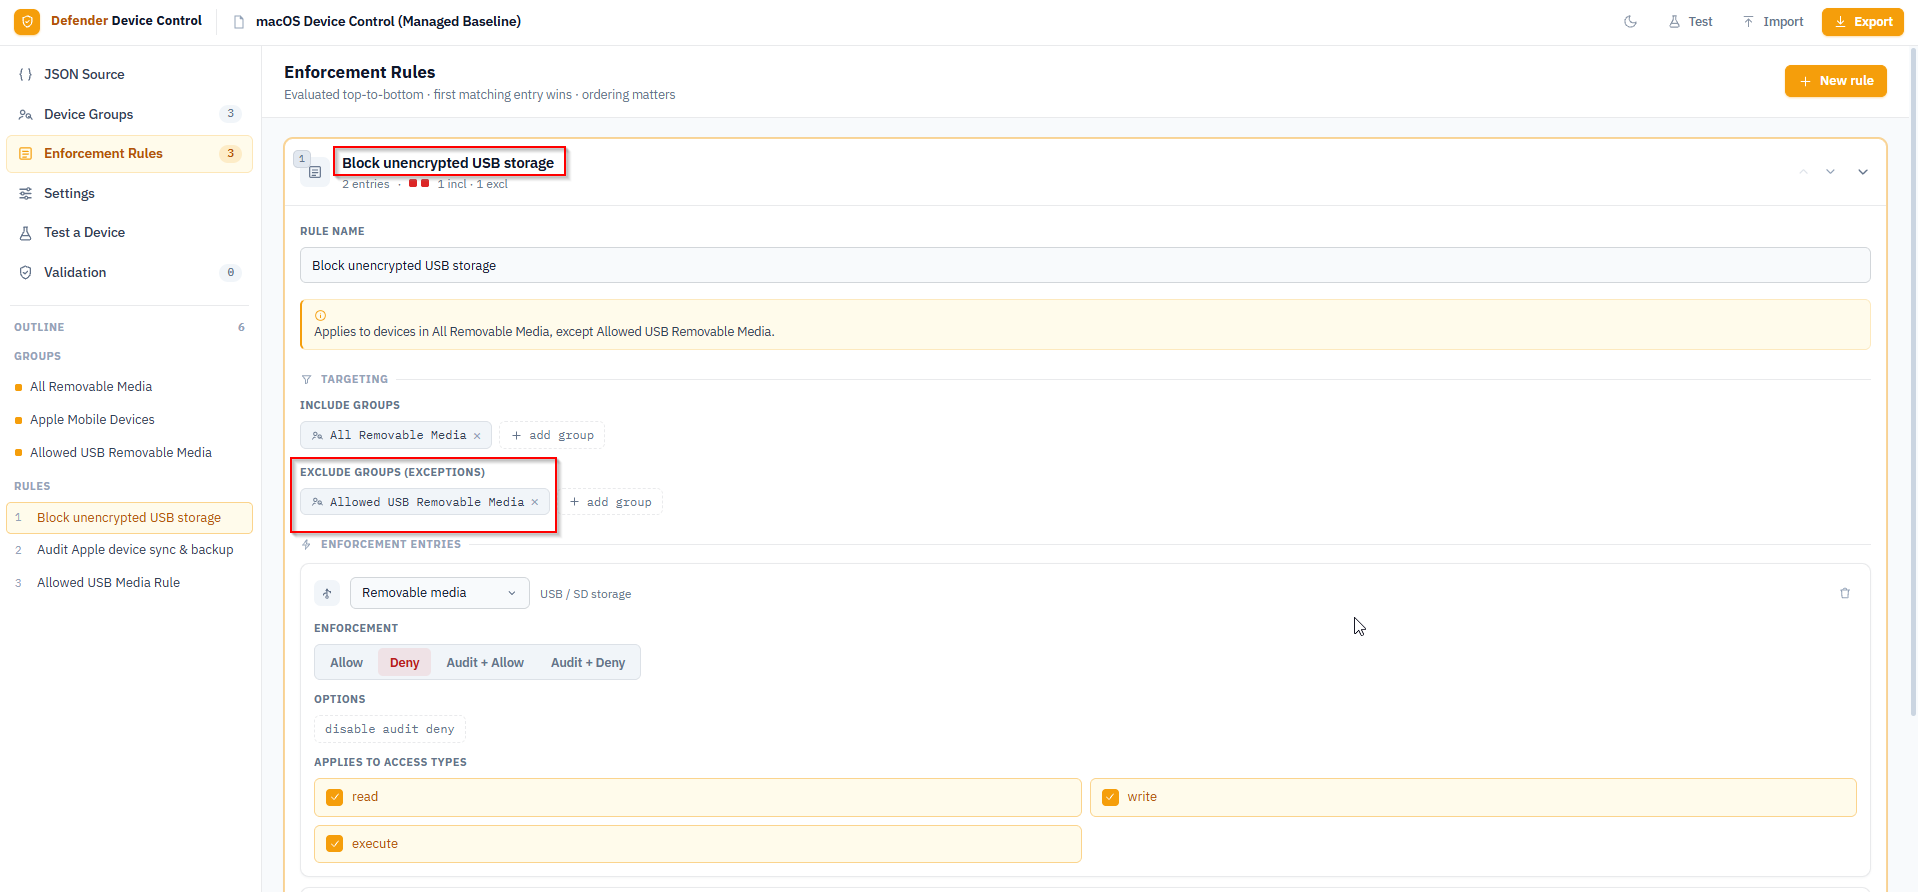
Open the Block unencrypted USB storage rule and add Allowed USB Removable Media to the Exclude Groups section. The editor updates the summary banner to show the rule now applies to all removable media except the allowed devices.
Add an Allow Rule for the Approved Device
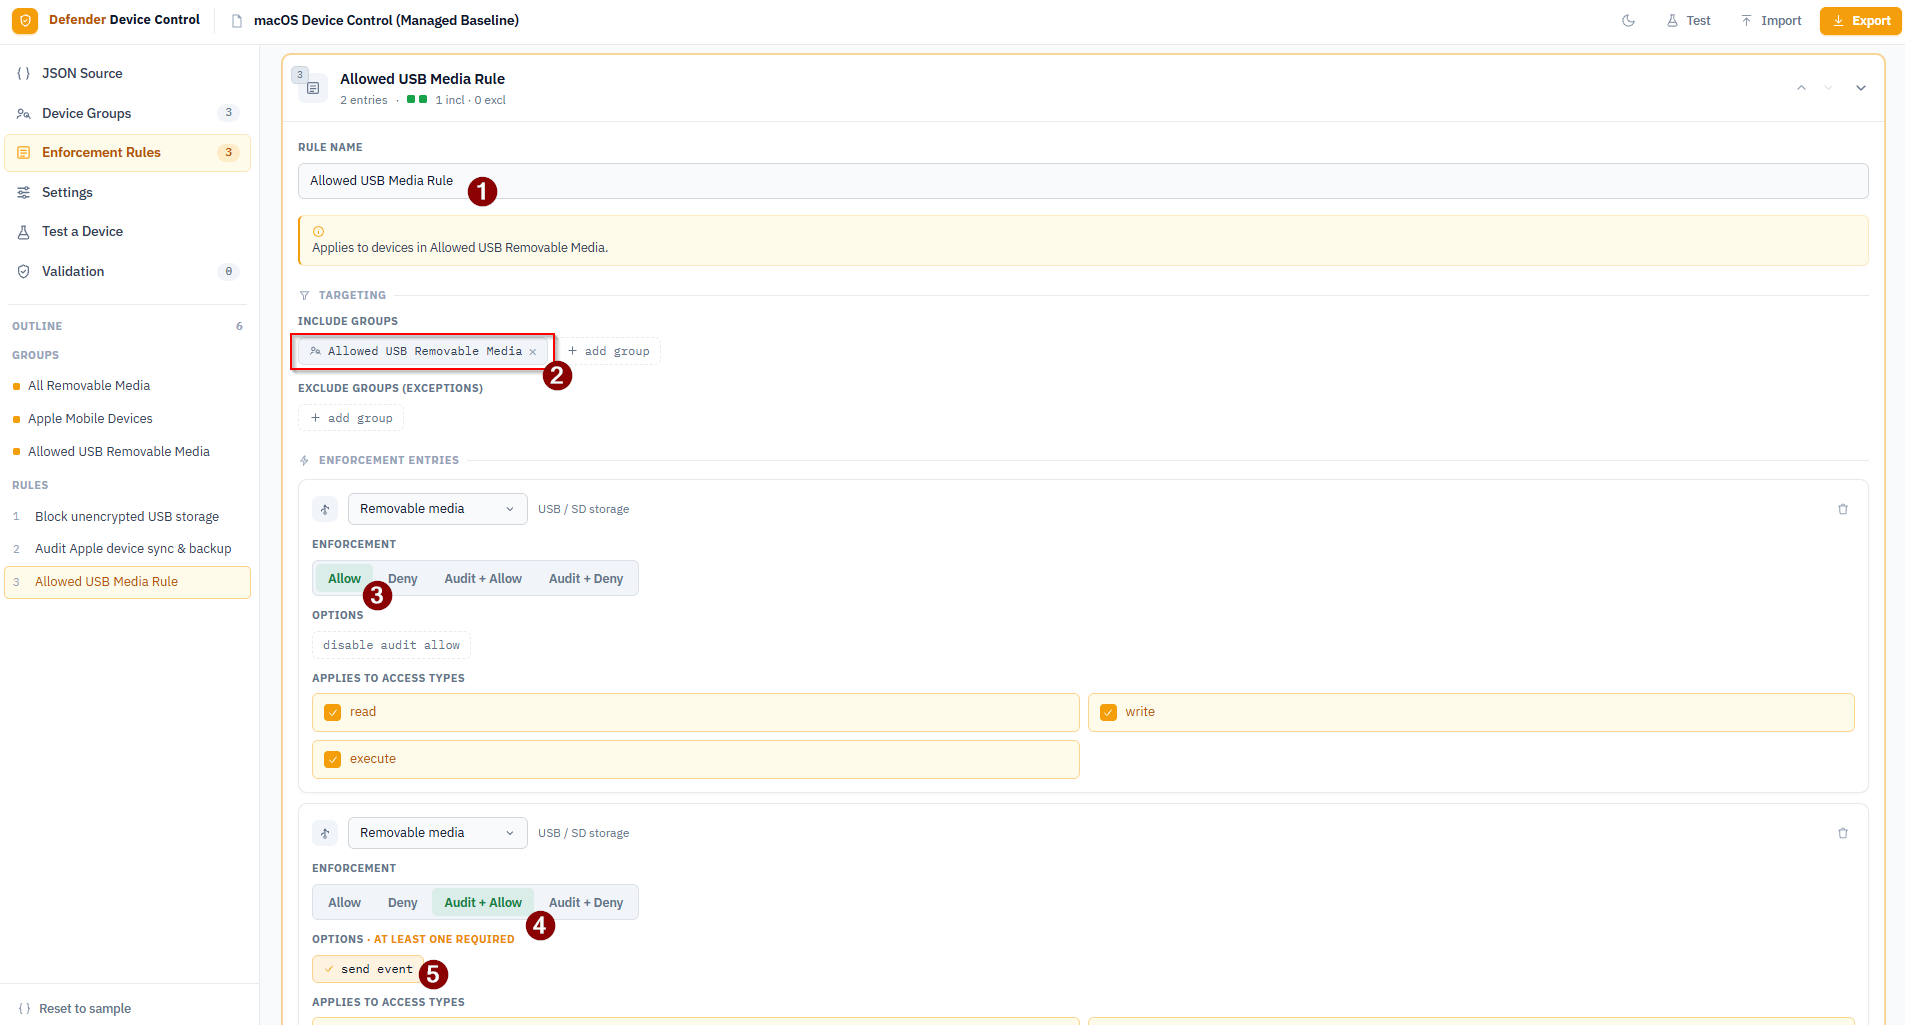
Add a new rule named Allowed USB Media Rule:
- Set the rule name
- Add Allowed USB Removable Media to Include Groups
- Add a first enforcement entry: Allow for read, write, and execute (with
disable audit allow) - Add a second enforcement entry: Audit + Allow with
send eventfor read, write, and execute – this keeps an audit trail of approved device usage
Place this rule before the block rule in the list so it matches first. Rules are evaluated top-to-bottom.
Export and Redeploy
Export a new .mobileconfig from the editor, then update the existing Intune configuration profile by uploading the new file. Intune will push the updated policy to enrolled devices on the next check-in.
After the policy syncs, verify the previously blocked device now mounts successfully, and check that a new Allow event appears in the Device control report for it.
Troubleshooting
If the policy does not seem to be taking effect, the following mdatp commands run directly on the Mac can help diagnose what the client has received.
Check whether device control is enabled and what the default enforcement is:
mdatp device-control policy preferences list
This shows the current enforcement mode (allow/deny by default) and which device families are enabled. If device control is not listed as enabled here, the settings section of your policy either has not synced yet or has a configuration problem.
Check if the policy rules have reached the client:
mdatp device-control policy rules list
Lists all enforcement rules the agent has loaded. If this returns nothing while the profile is shown as installed in Intune, wait a few minutes for the agent to pick up the change or re-trigger an MDM sync.
Check if the device groups have reached the client:
mdatp device-control policy groups list
Lists all device groups. Cross-reference the group IDs shown here with the ones exported from the editor to confirm the right version of the policy is active.
Microsoft Documentation
- Device control for macOS
- Device control for macOS - FAQ
- Device control report and Advanced Hunting queries
- Advanced Hunting - DeviceEvents table
- Microsoft Device Control samples on GitHub (note: samples may not always reflect the latest schema)