The Microsoft 365 traffic profile in Global Secure Access is included in Microsoft 365 Business Premium. No add-on, no Entra Suite, nothing extra to buy. That is easy to miss, because most of what is written about Global Secure Access is written about Private Access and Internet Access, which are not included.
Two of those names are almost identical and mean quite different products. Internet Access for Microsoft Services is what Business Premium includes, and it is the Microsoft 365 traffic profile this article deploys. Plain Internet Access is the full outbound proxy with web content filtering, and it is a separate purchase.
It is worth turning on for two reasons.
It gives you a network signal that cannot be faked. The usual way to say “this session came from the office” is a named location holding a public IP range, and that construct has aged badly. Everyone is remote half the time, so the range stops matching real users; and a token replayed from anywhere can be paired with a VPN or a proxy that lands on the right address. The Compliant Network check works differently: it is satisfied only when the traffic actually arrives through your tenant’s Global Secure Access edge, from a device running the client, signed in as that user. There is no IP range to guess and nothing to spoof from outside. Conditional Access policies that used to say “trusted IP” can say “compliant network” instead and finally mean it.
And you get to see the traffic. Microsoft 365 traffic that used to leave the device unobserved now shows up in the Global Secure Access logs, per user and per device. For a tenant that has never had anything between the endpoint and Microsoft’s edge, that visibility on its own is worth the rollout.
So I set out to deploy it, and hit the thing this article is really about. Microsoft’s documentation for the Windows client is good, but the part that matters most - locking the client down so a user cannot simply switch it off - is written entirely as an Intune Remediation. The licensing requirements for Remediations are a short list: Windows Enterprise E3 or E5 (which is how Microsoft 365 F3, E3 and E5 qualify), Windows Education A3 or A5, or Windows Virtual Desktop Access per user. Business Premium includes Windows 11 Business, which is on none of those lines. Note that this is a user licence requirement rather than an Intune one - Business Premium’s Intune Plan 1 is not the missing piece, and no Intune add-on buys your way in either. Follow the documentation on a Business Premium tenant and you get as far as the client being installed and trivially disabled by anyone who finds the tray icon.
This is how I deployed it anyway. Nothing here is Business Premium only - if you have E3 or better, every step works the same, you just have the option of pasting the scripts into a Remediation instead of wrapping them. The scripts and profile exports are in SasStu/Intune-Misc: the client settings under Remediations/Set-GlobalSecureAccessClientSettings/, the browser profiles under ConfigurationProfiles/GlobalSecureAccess/.
Enabling the service
Order matters here. A traffic profile cannot be assigned to anyone until the layers underneath it are switched on:
- Enable Global Secure Access - Entra admin center, Global Secure Access > Get started, activate the service for the tenant. This needs the Global Secure Access Administrator role. Nothing else on the blade does anything until this is done.
- Enable the traffic forwarding profile - Global Secure Access > Connect > Traffic forwarding, toggle the Microsoft 365 access profile to On. It is off by default.
- Then assign it - only now can you add users and groups. Assigning a profile while it is still toggled off, or before the service is enabled, either fails outright or silently does nothing on the client.
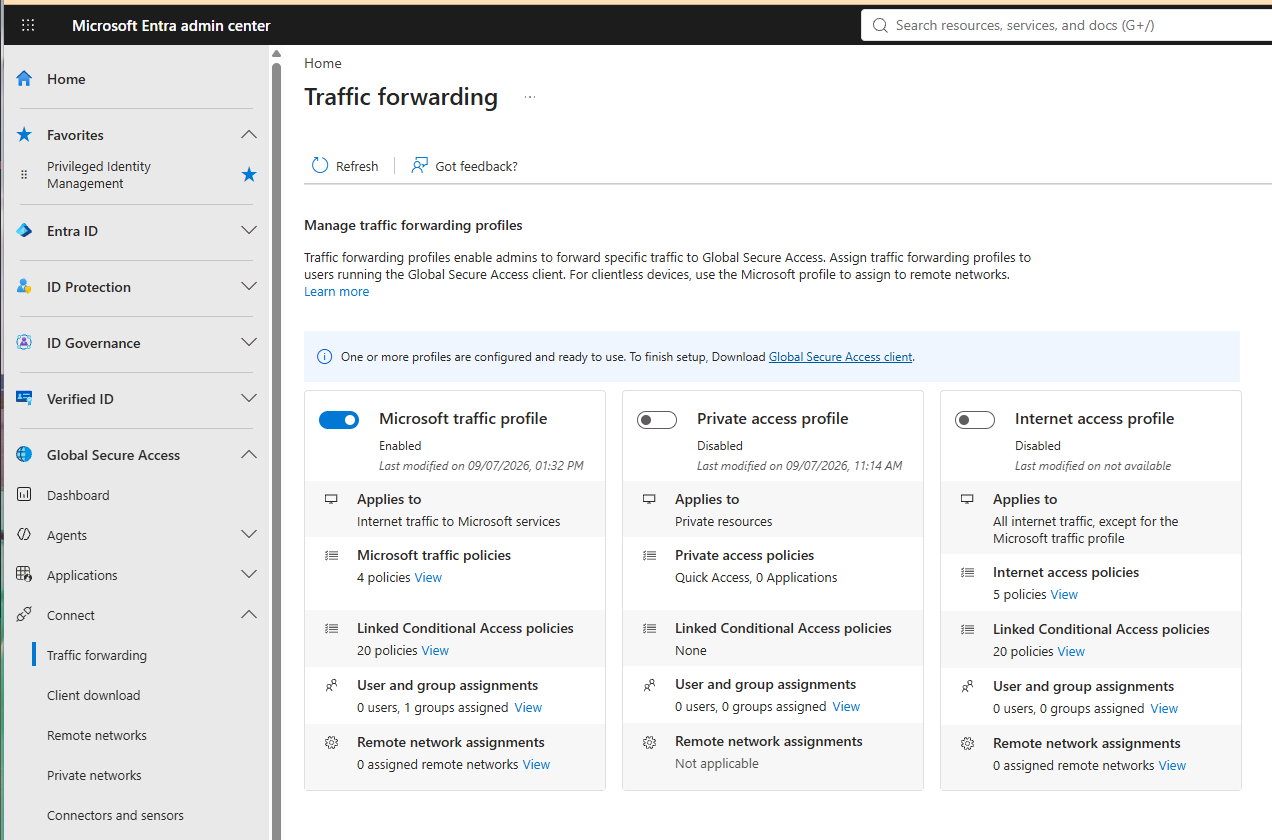
That is the whole blade on a Business Premium tenant: Microsoft traffic on, the other two left alone. Note the User and group assignments row on the card, which is the shortcut into the assignment described next.
Enabling a profile does not move any traffic by itself. The client starts tunnelling once a user in an assigned group signs in on a device that has the client installed.
Docs: Enable the Global Secure Access preview and Enable the Microsoft 365 traffic forwarding profile.
Assigning the profile takes two roles
The forwarding profiles surface as Enterprise Applications (the “Global Secure Access …” apps), and that is where the assigned users and groups live. So assigning one needs both:
- Global Secure Access Administrator - to manage the profile itself, and
- Application Administrator (or Cloud Application Administrator) - to change the user and group assignment on the underlying enterprise app.
A Global Secure Access Administrator on its own can edit the profile but cannot assign it, and the error you get does not make that obvious.
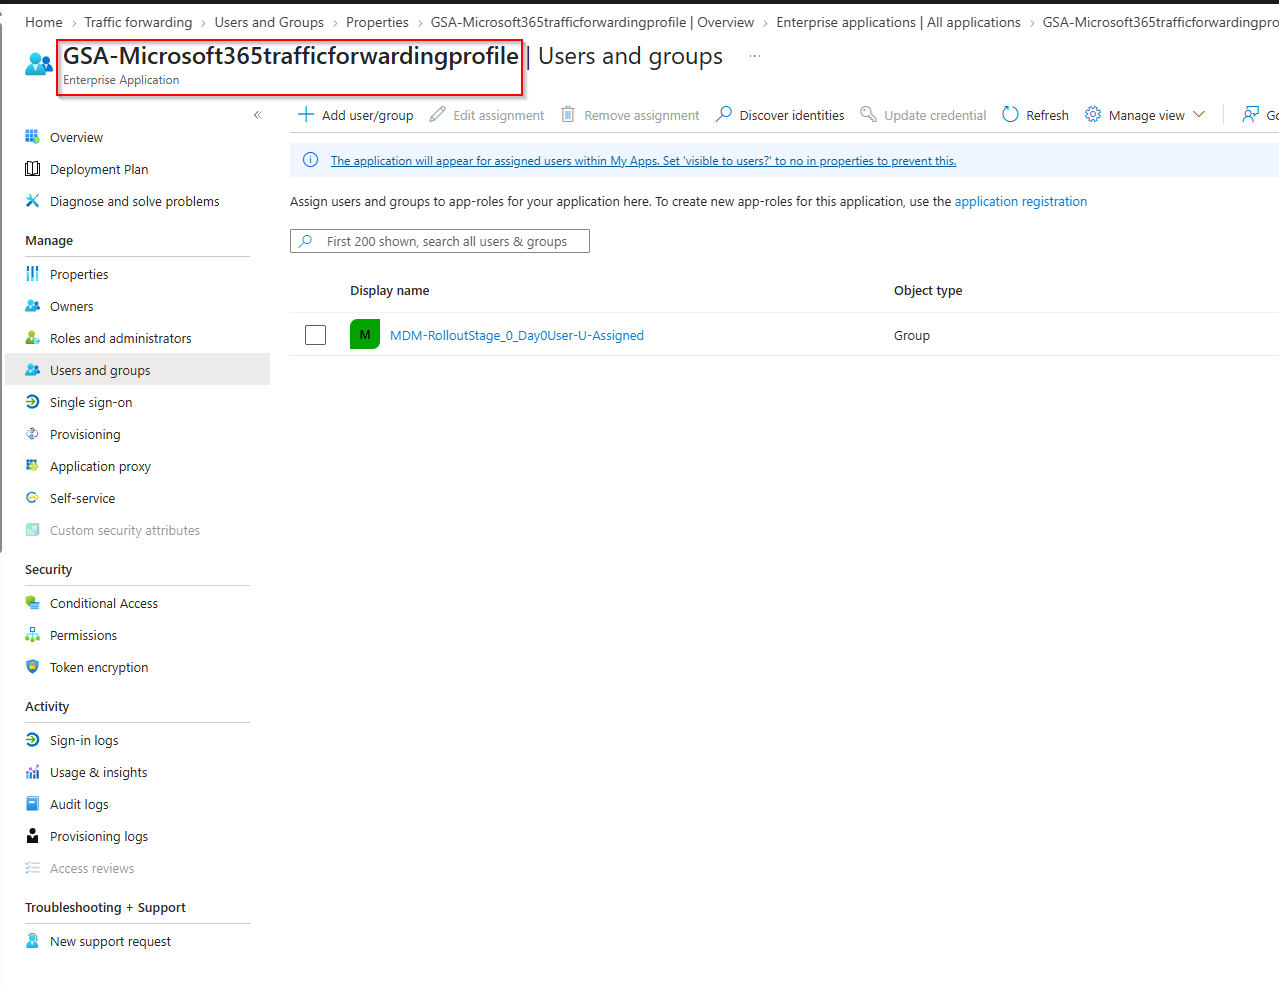
The breadcrumb is the giveaway: you started on Traffic forwarding and ended up on an enterprise application called GSA-Microsoft365trafficforwardingprofile. Same blade, same assignment model as any other app.
While you are on that app, hide it. The portal actually tells you this, in the information banner on that very screen: “The application will appear for assigned users within My Apps. Set ‘visible to users?’ to no in properties to prevent this.” Everyone you assign gets a tile in the My Apps portal for something that does nothing a user would recognise as useful. Open Properties on the same app and set Visible to users? to No.
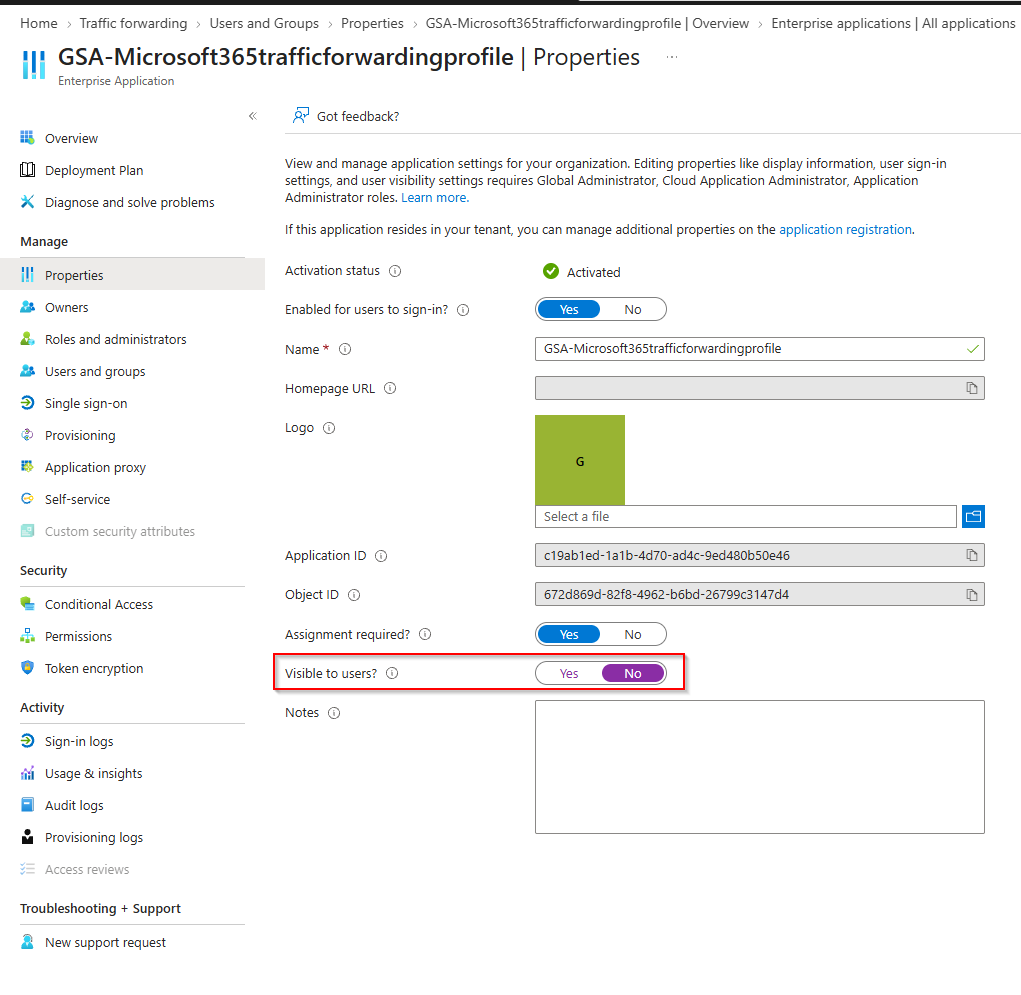
The assignment still works exactly as before - visibility only controls the My Apps tile - and you save yourself the support ticket asking what “GSA-Microsoft365trafficforwardingprofile” is and whether it is safe to click.
Deploying the client app
Microsoft’s Install the Global Secure Access client for Windows article covers the installer properly - the silent switches, the packaging script, the return codes - so I will not repeat it.
What is worth saying, because you will go looking for it: Global Secure Access is not in the Enterprise App Catalog. Intune’s Enterprise App Management cannot install it, cannot update it, and no amount of scrolling the catalog will make it appear. You are either wrapping the installer yourself as a Win32 app, or handing it to a third-party packaging service.
I use a PatchMyPC package. The wrapping is the easy part; what you actually want is somebody keeping up with the client releases, which a hand-built .intunewin leaves you doing by hand every time Microsoft ships a new version.
Careful with what you skip by not using Microsoft’s package. Their packaging script does not only run the installer, it also sets the IPv4Preferred registry value next to it. Deploy the client any other way - PatchMyPC, your own wrapped .exe, anything - and nothing sets that value. It is the one piece of Microsoft’s install procedure that silently does not come with you, and I missed it on the first pass. It has moved into the settings app below, which is a better home for it anyway.
However you package it, deploy it as a Win32 app assigned Required to a device group, and keep note of the app name - the settings app in a moment will take a dependency on it.
The settings you cannot configure from Intune
With the client installed and the profile assigned, traffic flows. Three things are still wrong, and none of them has an answer in the Intune UI.
Any user can turn the client off. By default the tray icon offers Disable and Sign out. A standard user clicking Disable drops themselves off the tunnel, out of the traffic logs, and out of the Compliant Network signal - which means a Conditional Access policy built on that signal is only as strong as the least curious person in the company. The switches that remove those menu entries are four REG_DWORD values under HKLM\SOFTWARE\Microsoft\Global Secure Access Client.
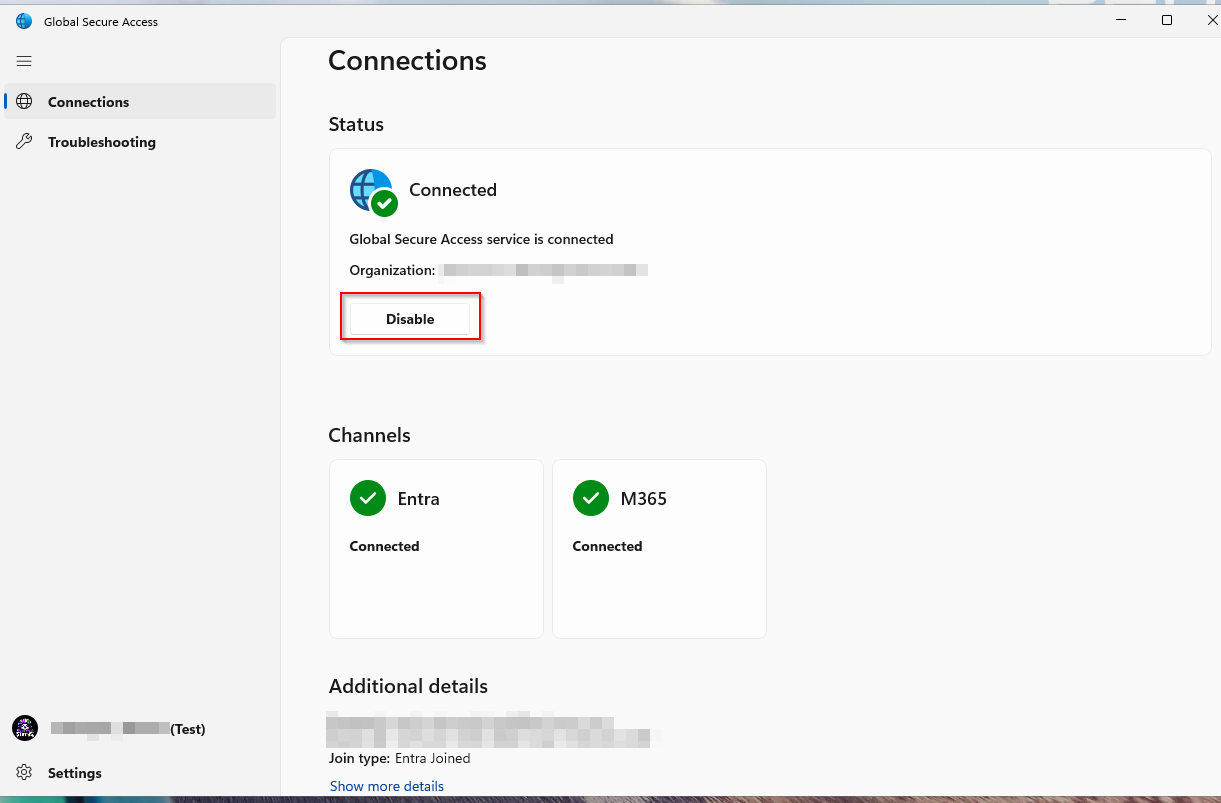
That is the default state, and the Disable button is one click away for anyone on the device. Everything in this section exists to remove it.
There is no Global Secure Access client section in the Settings Catalog. Not a missing setting or an unsupported option - the client simply has no presence in the catalog at all. And the obvious workaround, authoring a custom ADMX for those four values, does not work either: they live under a restricted registry path that the Policy CSP refuses to write through a custom ADMX. Whatever you do, it comes down to running a script on the device.
The IPv4 preference is missing. This is the one from the previous section. Microsoft’s packaging script sets what the docs call the IPv4Preferred key, and the name is a small trap: there is no value called IPv4Preferred anywhere. What the script actually writes is DisabledComponents = 0x20 under HKLM\SYSTEM\CurrentControlSet\Services\Tcpip6\Parameters, the Windows IPv6 prefix policy, which tells the stack to prefer IPv4 where both are available. Different hive, different subsystem, nothing to do with the GSA key - which is exactly why searching the Settings Catalog for it gets you nowhere. It needs a reboot to take effect.
Secure DNS stops the client working. QUIC is a narrower problem than it looks. These two get lumped together a lot, including by me when I started. Microsoft treats them very differently and it is worth being precise.
Secure DNS is a hard requirement. The client does not support DNS over HTTPS, DNS over TLS or DNSSEC in any form, and the known limitations leave no room to interpret: “To configure the client so it can acquire network traffic, you must disable secure DNS.” That applies to every profile, Microsoft 365 traffic included. Microsoft documents switching it off by hand in Edge, Chrome and Firefox, which is fine for one machine and useless for a fleet, so it becomes policy.
QUIC is not the obstacle it is usually made out to be. The warnings you will read about it are about a profile this article does not cover: the same limitations page says QUIC is unsupported for Internet Access, and that is where the advice comes from. For the profile we are running it says the opposite, in as many words - “QUIC is currently supported in Private Access and Microsoft 365 workloads.” Microsoft 365 traffic tunnels perfectly well over QUIC.
It is still worth switching off in the browsers, for a smaller reason: the client’s own health check tests for it and reports a failure until you do, and Microsoft’s documented remedy for that is browser policy rather than a firewall rule. Falling back to HTTPS over TCP 443 costs a little performance and nothing else.
So the pieces to deliver, and what Intune can do for each:
| What | Needed when | Native Intune support |
|---|---|---|
| Client tray hardening (four registry values) | always | none - no catalog entry, restricted path blocks custom ADMX |
IPv4 preference (DisabledComponents) |
unless you deploy with Microsoft’s packaging script | none - not a GSA setting, and not in the catalog |
| Secure DNS off in the browsers | always - client requirement | Edge and Chrome yes, Firefox needs its own ADMX |
| QUIC off in the browsers | optional - to satisfy the health check | Edge and Chrome yes, Firefox needs its own ADMX |
The Win32 settings app
On a licensed tenant, the client settings would be an Intune Remediation: paste detection.ps1 and install.ps1 into a script package, schedule it daily, done. On Business Premium the Devices > Remediations blade tells you the tenant is not licensed. The blade is there and the script package can be built, because the device prerequisites are satisfied - Microsoft asks for an Entra joined or hybrid joined device running Windows Enterprise, Professional or Education, and Windows 11 Business meets that. It is the user licence that is missing, and it fails at the point where it would actually run.
A Win32 app is already a detect-and-fix loop though: it evaluates a detection rule, and runs the install command when the rule says “not there”. Point the detection rule at your condition rather than at a product and you have a remediation in everything but name, licensed under Intune Plan 1. That is the pattern from The Poor Man’s Remediation: Win32 Apps for Tenants Without Remediation Licenses, applied here to the GSA client keys.
The three scripts are named detection.ps1 / install.ps1 / uninstall.ps1, and those names serve as both the Remediation detection and remediation pair and the Win32 detect, install and uninstall commands. One folder, both delivery models, nothing to fork.
What the scripts do
Both detection.ps1 and install.ps1 open with an identical CONFIG banner that must be kept in sync. It is the settings table as code:
$RegPath = 'HKLM:\SOFTWARE\Microsoft\Global Secure Access Client'

$RegValues = [ordered]@{
    RestrictNonPrivilegedUsers     = 1   # non-admins cannot disable/enable the client
    HideDisableButton              = 1   # hide tray "Disable"
    HideSignOutButton              = 1   # hide tray "Sign out"
    HideDisablePrivateAccessButton = 1   # hide tray "Disable Private Access" (no-op without Private Access)
}

# "IPv4Preferred" - Windows IPv6 prefix policy, not a GSA key. Reboot to apply.
# Set $IPv4RegValue to $null to skip.
$IPv4RegPath  = 'HKLM:\SYSTEM\CurrentControlSet\Services\Tcpip6\Parameters'
$IPv4RegName  = 'DisabledComponents'
$IPv4RegValue = 0x20   # prefer IPv4 over IPv6
That second block is the part to think about before you assign anything. DisabledComponents is a bitmask covering rather more than the IPv4 preference, so writing 0x20 replaces whatever was there rather than adding to it. install.ps1 logs the previous value before overwriting it, and uninstall.ps1 removes the value only if it still holds 0x20, so a value someone set for an unrelated reason survives a rollback. If your estate already configures IPv6 deliberately, set $IPv4RegValue to $null in both scripts and leave that part alone.
detection.ps1 checks the key exists and that each value matches, then collects a readable reason for anything that does not:
if ($problems.Count -eq 0) { Write-Output 'Compliant'; exit 0 }
Write-Output ("Non-compliant: " + ($problems -join '; ')); exit 1
install.ps1 is idempotent: create the key if missing, write only the values that are actually wrong, leave the rest alone. It exits 0 normally, and 3010 on the one run that writes the IPv4 preference, because that value does nothing until the machine restarts and 3010 is how a Win32 app says so. Detail goes to %ProgramData%\Microsoft\IntuneManagementExtension\Logs\GSAClientSettings-install.log, next to the IME logs so Collect diagnostics picks it up with everything else.
Both must run in 64-bit PowerShell. In 32-bit on a 64-bit OS the registry writes land in the WOW6432Node redirect, so the app reports success while having configured nothing that matters. That is why the detection rule below sets run as 32-bit to No.
Packaging and creating the app
There is no application to install here, the payload is three scripts, but the Win32 model still insists on an .intunewin. And because the install, uninstall and detection scripts are all uploaded separately in the portal, nothing needs to be inside that package at all. It exists purely to satisfy the app type.
The quick way: use the pre-wrapped one. Apps/dummy.intunewin in the repo is exactly that, a zero-byte dummy.txt already wrapped. Download it, upload it as the app package, and move straight on to the fields below. It carries nothing tenant-specific, so it works as-is.
The alternative: wrap your own. If you would rather not upload a binary you did not build, it takes one command. Put a 0-byte dummy.txt in an empty folder and point the packager at it:
IntuneWinAppUtil.exe -c . -s dummy.txt -o <out>
Either way you end up with the same near-empty package.
Intune admin center > Apps > Windows > Add > Windows app (Win32)
| Field | Value |
|---|---|
| Install | PowerShell script - upload install.ps1 |
| Uninstall | PowerShell script - upload uninstall.ps1 |
| Install behavior | System |
| Detection rule | custom detection script - detection.ps1, run as 32-bit: No |
| Device restart behavior | Determine behavior based on return codes |
| Return codes | leave the defaults |
On the Program page, take the PowerShell script option and upload the script rather than typing an install command line.
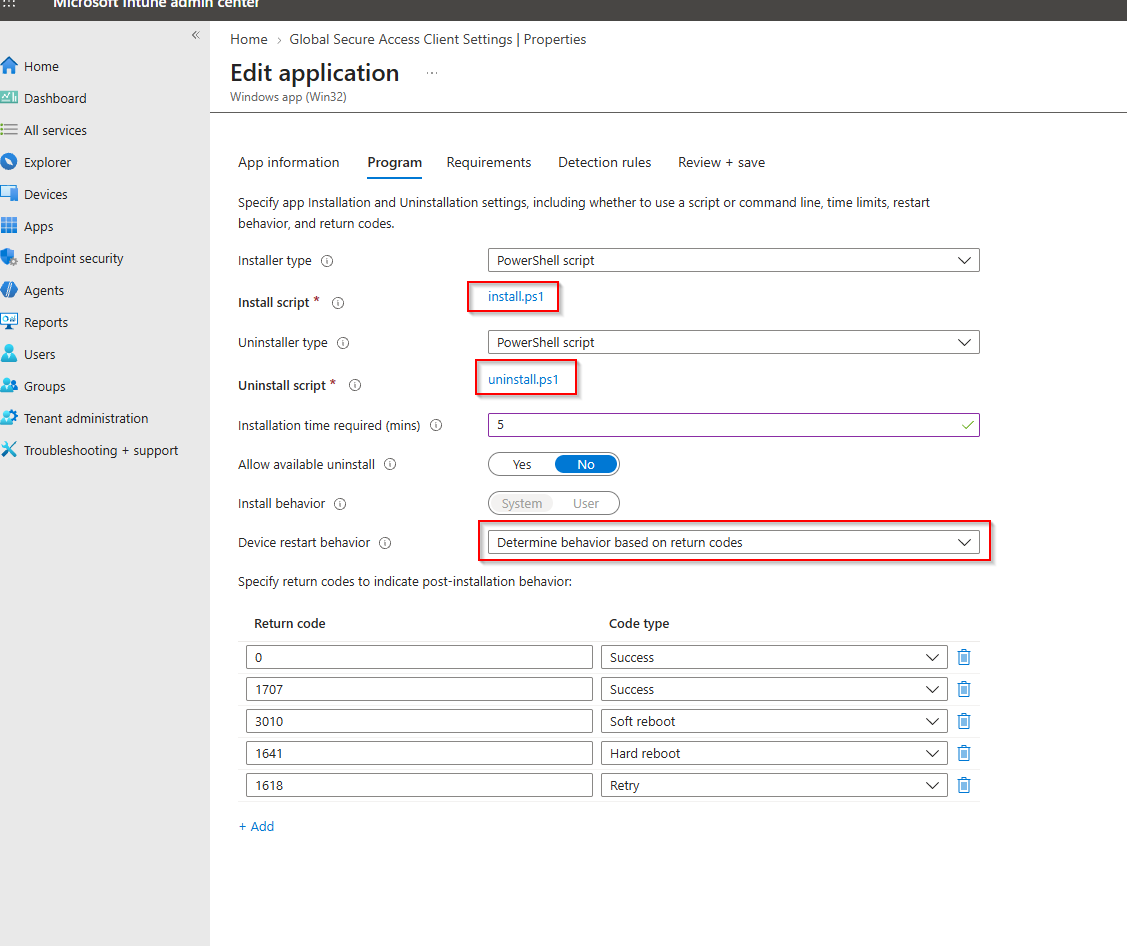
The option is oddly hidden. The PowerShell script toggle stays greyed out until the install command line has something in it, so you have to type a character into the command field you are not going to use before the portal will let you switch away from it. Type anything, flip to PowerShell script, upload the file. Do the same on the uninstall side.
The default return codes need no editing, but they are worth reading once, because the script leans on two of them. install.ps1 exits 0 normally and 3010 on the run that writes the IPv4 preference - and 3010 is already in the default table as Soft reboot, so the app still reports as installed while telling Intune a restart is outstanding. Its 1603 fatal path is not in the table at all, which is fine: anything unlisted counts as a failure, which is exactly the intent.
That 3010 is only worth returning if something acts on it, which is why Device restart behavior is set to Determine behavior based on return codes rather than left on No specific action. Otherwise the exit code is recorded and ignored, and the setting sits inert until the device happens to reboot for some other reason.
One caveat if you deploy these scripts as a Remediation instead: a Remediation files any non-zero exit as a failed remediation, so the first run on every device would be reported as a failure despite having worked. The script keeps that switchable - set $SoftRebootExitCode to 0 at the top of install.ps1 for that delivery model.
Intune re-evaluates the detection script on the app check-in cycle, so drift gets corrected on the next check-in rather than on a schedule you choose - the one real difference from a daily Remediation.
Make it depend on the client app
This is the part that makes the whole thing tidy. On the settings app, open Dependencies > Add and select the GSA client app from the previous section, with Automatically install before this app set to Yes.
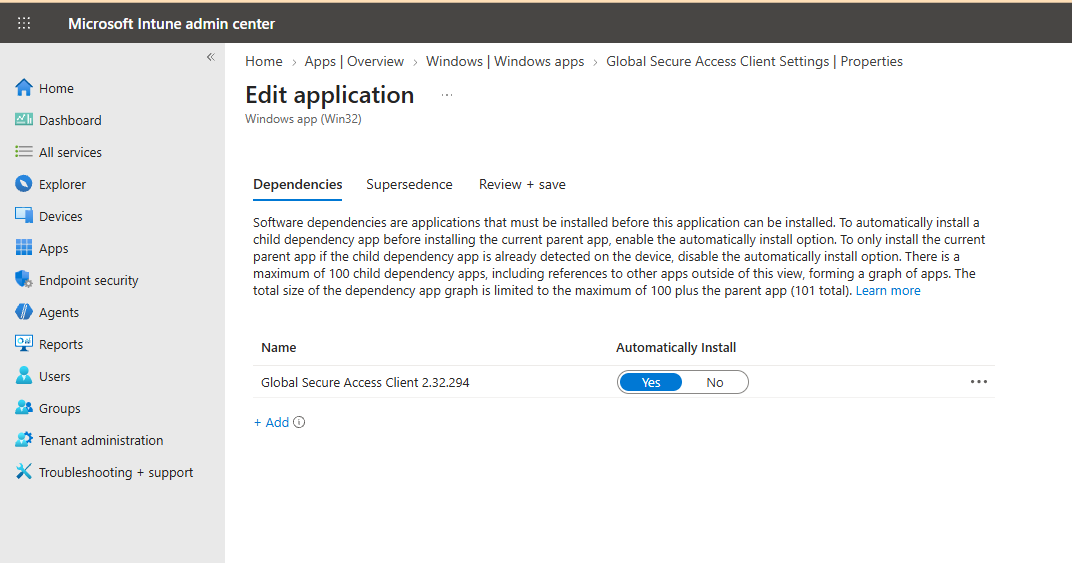
Now you assign one app. Intune installs the Global Secure Access client first, then applies the settings on top, in that order, on every device in the group. No ordering by hand, no settings landing on a device that has no client yet and quietly doing nothing useful. Assign the settings app Required to your device group and leave the client app unassigned - the dependency pulls it in.
Browser settings: QUIC and DNS over HTTPS
This is where Microsoft actually points you, and the DNS half is the part you should not skip: secure DNS has to be off or the client cannot acquire traffic at all. The QUIC half is the optional one, there to keep the health check quiet rather than to make anything work.
These profiles are the whole of the QUIC and DoH story. There is no OS-level piece to pair them with.
Edge and Chrome
The easy half - these do have Settings Catalog entries. A profile with four rows, all Disabled:
- Chrome Allow QUIC protocol / Edge Allow QUIC protocol
- Chrome DNS-over-HTTPS mode / Edge Control the mode of DNS-over-HTTPS
The export in ConfigurationProfiles/GlobalSecureAccess/EdgeChrome/ came straight out of the portal, so it goes straight back in. Devices > Configuration > Import policy, select the file, assign it to your device group. Nothing to edit first.
Firefox
Firefox ignores both of those and ships its own DoH resolver and HTTP/3 stack, so it needs a Mozilla policy of its own.
Microsoft asks for exactly two things here. Set network.http.http3.enable to false, and turn DNS over HTTPS off. As policy that is one preference and one dedicated policy key:
| Setting | Value | Effect |
|---|---|---|
DNSOverHTTPS policy |
Enabled: false, Locked: true |
No DoH, and the user cannot switch it back on |
network.http.http3.enable |
false locked |
No QUIC / HTTP3; HTTPS over TCP 443 |
Everything else in the files below is my own addition, worked out with the help of Claude, and it is worth knowing which is which before you inherit it:
| Preference | Why it is there | Worth keeping? |
|---|---|---|
network.dns.native_https_query |
Stops HTTPS RR lookups, which is how ECH bootstraps - and ECH hides SNI from a web content filter | Not for this deployment. It protects a filter the Microsoft 365 profile does not have |
network.trr.mode = 5 |
“Off by choice” rather than plain default-off | Belt and braces - the DNSOverHTTPS policy already turns DoH off and locks it |
network.trr.uri = "" |
Clears any configured DoH resolver URL | Redundant once DoH is off and locked |
network.http.http3.enable_kyber |
Disables the HTTP/3 key-exchange variant | Moot with HTTP/3 already off |
If you want the smallest policy that satisfies Microsoft, take the first table and drop the rest. Note that the -baseline files in the repo still carry network.dns.native_https_query alongside Microsoft’s two, so trim that line if you want the true minimum. I keep all of them because a locked preference costs nothing and survives Firefox changing its defaults, but that is a preference, not a requirement.
Status: "locked" greys the preference out in about:preferences and blocks about:config overrides.
network.trr.mode5 vs 0. Microsoft’s own Firefox remediation uses0, plain default-off, which leaves DoH available for a user to switch on manually.5is “off by choice” and cannot be overridden. If you keep the preference at all,5is the safer default in a managed fleet; set the same value whichever file you deploy.
Option A - imported ADMX. Devices > Configuration > Import ADMX, add firefox.admx and firefox.adml (plus mozilla.admx / .adml) from a policy-templates release and wait for Available. Then Create > New Policy > Windows 10 and later > Templates > Imported Administrative templates, and under Mozilla > Firefox enable Preferences (JSON) and paste the object from firefox-preferences-baseline.json or firefox-preferences-hardened.json - the bare object, not wrapped in policies. Also enable DNS Over HTTPS and set it to Disabled. This writes under HKLM\SOFTWARE\Policies\Mozilla\Firefox, read on next launch.
Option B - policies.json drop-in. Take policies-baseline.json or policies-hardened.json, rename it to policies.json and ship it to C:\Program Files\Mozilla Firefox\distribution\policies.json with a small Win32 app. Same file Microsoft’s own Firefox remediation maintains.
Whichever option you take, expect the client’s health check to insist QUIC is still enabled in Firefox afterwards. It is not, and the testing section below goes into why.
Testing it
Restart the client (or reboot) after the settings land, then on a target device:
Get-ItemProperty 'HKLM:\SOFTWARE\Microsoft\Global Secure Access Client' |
    Select RestrictNonPrivilegedUsers, HideDisableButton,
           HideSignOutButton, HideDisablePrivateAccessButton

Get-ItemProperty 'HKLM:\SYSTEM\CurrentControlSet\Services\Tcpip6\Parameters' |
    Select DisabledComponents
DisabledComponents reads back as 32, the decimal form of 0x20. The value being present is not proof it took effect, though - that needs a reboot, and netsh interface ipv6 show prefixpolicies is what actually confirms it: after the restart, the ::ffff:0:0/96 row that carries IPv4 sorts above ::/0.
The visible result is on the client itself:
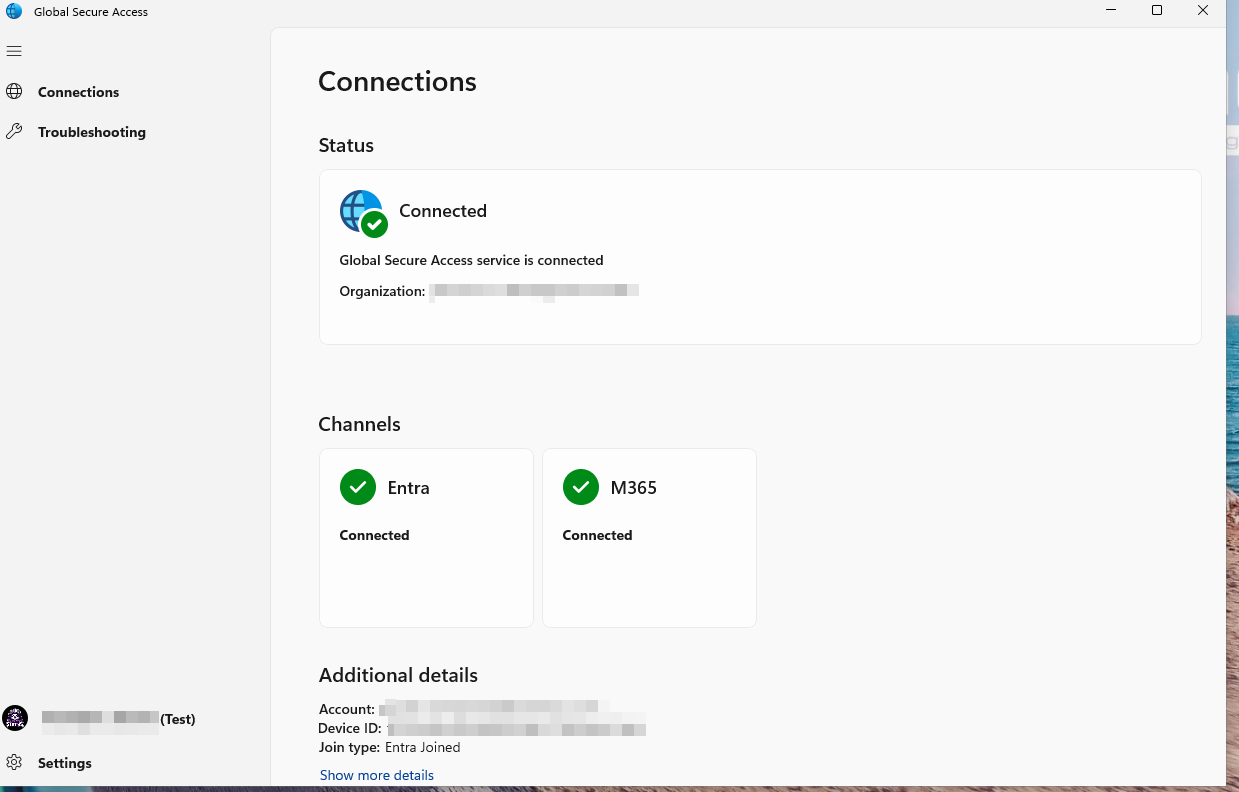
Same window as the one further up, minus the Disable button. The client is still connected on both channels; the user simply has no way to switch it off.
Then use the client’s own diagnostics, which is the check I wish I had reached for first. Right-click the tray icon, choose Advanced Diagnostics, and open the Health check tab. It tests the things this article has been working around, in Microsoft’s own words. The tests depend on one another, so fix the first failure in the list and hit Refresh rather than reading the whole list as independent problems.
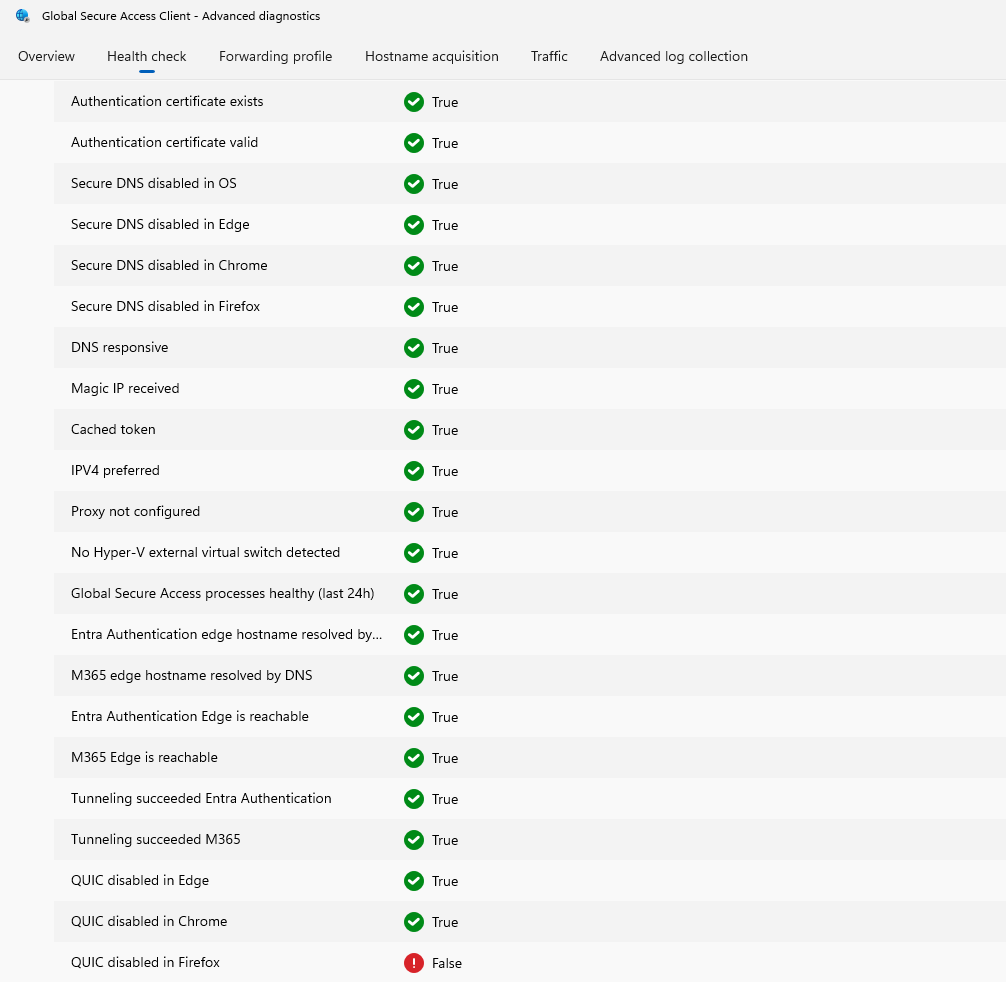
Two rows there are worth pointing at. IPV4 preferred is True, which is the DisabledComponents value from earlier being read back by the client rather than by you - that is the check that would have caught it had I run this first. And Secure DNS disabled in Firefox is True, which matters for the next part.
The one row that stays red
QUIC disabled in Firefox reports False. The policy is applied correctly:
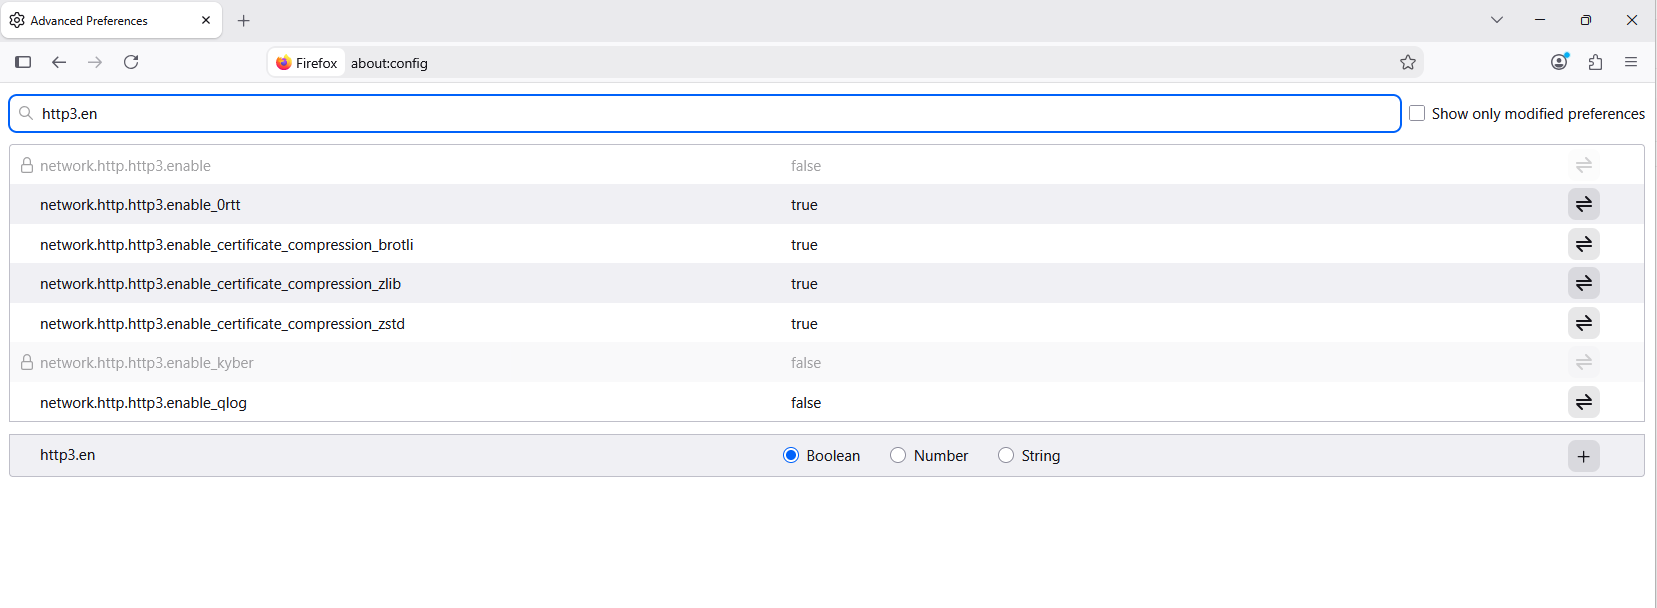
network.http.http3.enable is false, and the padlock means locked by policy - there is no toggle to press. QUIC really is off in Firefox. The health check disagrees anyway.
What makes this interesting is the row above it. Secure DNS disabled in Firefox passes, and that is delivered by exactly the same policy file. So the client can read policy-applied Firefox settings in general; it is this one test that does not see them.
The reason is not documented anywhere I could find, so treat what follows as my reading rather than Microsoft’s. DNS over HTTPS has a dedicated DNSOverHTTPS policy that lands in a predictable spot under HKLM\SOFTWARE\Policies\Mozilla\Firefox. QUIC has no dedicated policy - network.http.http3.enable arrives through the generic Preferences mechanism, and a preference set with Status: "locked" is applied to the default branch at startup and never written into the profile’s prefs.js. Microsoft’s documented fix for this row is the manual about:config toggle, which does write to prefs.js. A check that reads the profile would find nothing in the policy case and everything in the manual case, which is exactly what the screen shows.
If that reading is right, you could turn the row green by shipping the preference with Status: "user" instead of "locked", which persists it to prefs.js - at the cost of letting any user set it straight back. For a setting whose entire purpose is that it cannot be overridden, that is the wrong trade. I left it locked and treat the red row as a known false negative.
Either way, do not take the health check’s word for it in either direction. The honest test is to load an HTTP/3-capable site with the developer tools open and read the Protocol column in the Network tab: h2 means the fallback is working, h3 means it is not.
Beyond that:
- Tray menu - Disable and Sign out are gone. Sign in as a standard user and confirm that disabling the client now demands admin credentials.
- Firefox -
about:policieslists Preferences and DNSOverHTTPS as active, andabout:networking#dnsshows TRR not in use. - Traffic - the Global Secure Access logs show Microsoft 365 traffic for the test user, which is also the confirmation that the profile assignment worked.
That last one is the proof that the whole exercise did something:
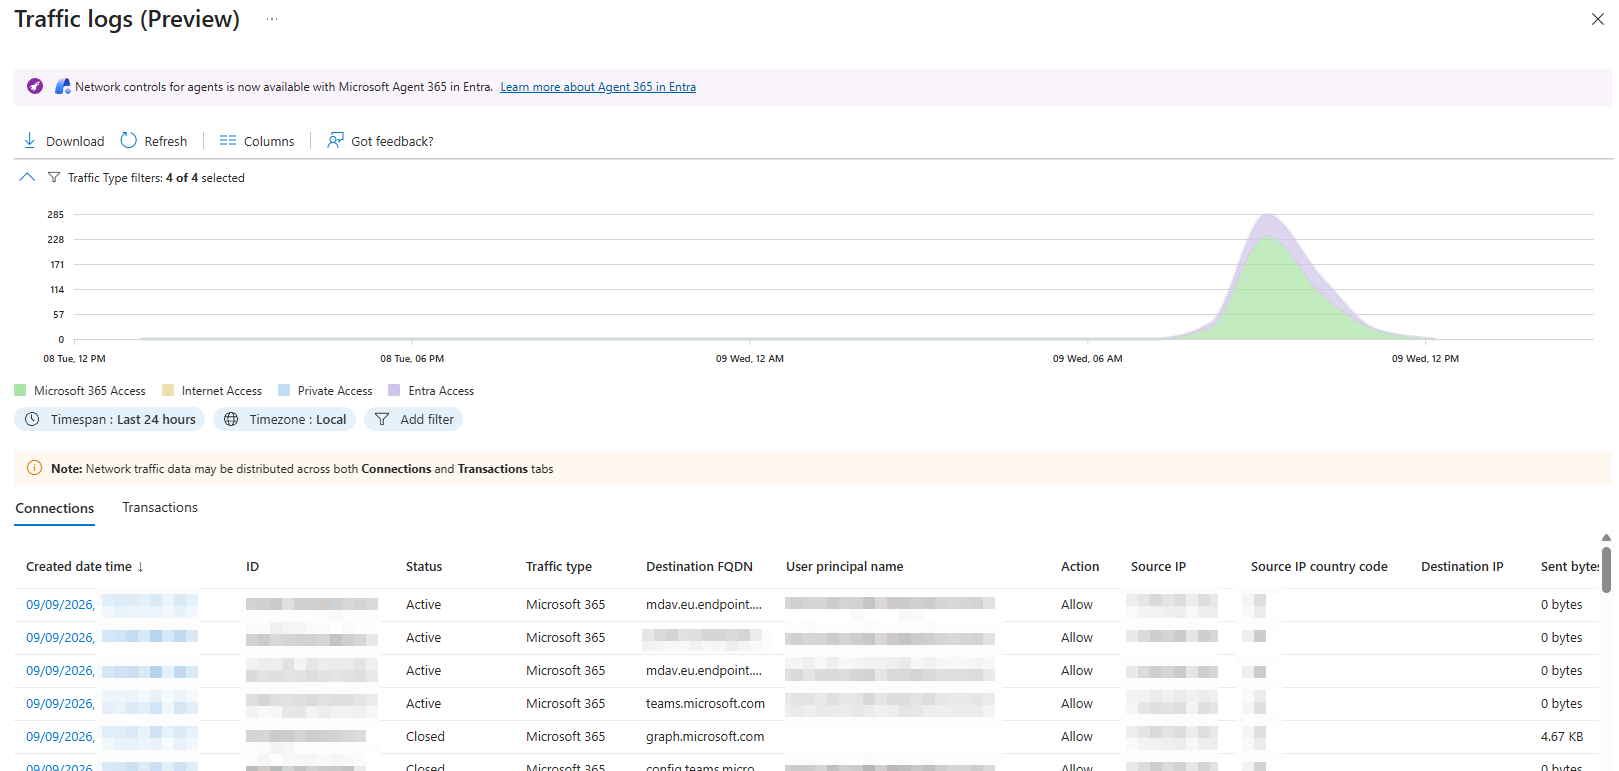
Microsoft 365 traffic, per connection, with the user and the destination attached - on a tenant where that traffic previously left the device unobserved. This is the “traffic insights” from the top of the article, arriving.
What comes next: Conditional Access
The point of all this is to be able to write a Conditional Access policy on the Compliant Network signal instead of on an IP range. That is a bigger job than it looks, and it is worth understanding the shape of it before you enable anything in report-only.
The signal only exists where the client is installed. Global Secure Access has clients for Windows, macOS, iOS and Android, and a compliant network condition applied to “all platforms” will block every device that is not running one. Ship Windows first and enable a strict policy tenant-wide, and every phone in the company stops working. So either you roll the client out on all four platforms before the policy goes on, or you split the policy.
And you probably do want to split it. Two cases break the “client everywhere” model outright:
- MAM-only mobile devices. If you allow personal phones with app protection policies and no enrolment, there is no managed client to install, so those sessions can never satisfy a compliant network check. They need their own policy, granting on app protection policy instead.
- Unmanaged browser sessions. A user on a home PC in a browser has no client either. If you genuinely want to block that, a strict compliant network policy is exactly the right tool. If you want to allow it in some limited form, that is a separate policy with its own grant and session controls.
So the realistic end state is not one policy but a small set: compliant network for managed desktops, app protection for MAM mobile, and a deliberate decision about unmanaged browsers. Worth mapping out on paper before the first one goes into report-only.
Remarks
A few things that cost me time and do not fit anywhere else.
Advanced Diagnostics needs admin rights. The client’s own diagnostics window, the one with the Health check tab, only opens for a local administrator. That is by design and independent of the registry values in this article. It matters in practice because the person best placed to tell you what is wrong on a device, the user sitting in front of it, is exactly the person who cannot open the tool. Plan on doing that step yourself over a remote session, or leave the Get-ItemProperty check above as the thing a standard user can run and send you.
Administering someone else’s tenant. Reaching the Entra admin center of a tenant that already has you on its allow list can still return “Access denied” until the documented cross-tenant and partner feature flag is added. It has nothing to do with Global Secure Access, but it will bite you on the very first profile you try to configure from a partner context, and it looks exactly like a permissions problem you have caused yourself.
The other two profiles are not included. Business Premium covers the Microsoft 365 traffic profile and nothing beyond it, which is why Private Access and Internet Access stay switched off on the traffic forwarding blade above. Both are standalone add-ons in the SMB plan comparison, or come with the Entra Suite. Worth knowing if you ever want them: the add-ons list their prerequisite as Microsoft Entra ID P1, and Business Premium already includes that, so the upgrade path is a purchase rather than a re-licensing exercise. The HideDisablePrivateAccessButton value in the script is set anyway - it is a no-op without the licence and costs nothing to leave in place.
Still on my list. The forwarding profile as code, through Graph or Bicep, rather than clicked in the portal.
Sources
- Enable the Global Secure Access preview
- Enable the Microsoft 365 traffic forwarding profile
- Install the Global Secure Access Client for Windows
- Known limitations for Global Secure Access
- Troubleshoot the Global Secure Access client for Windows: Health check tab
- Modern Work Plan Comparison for Small and Medium-sized Businesses (PDF) - what Business Premium actually includes
- Use Remediations to detect and fix support issues - including the licensing requirements
- Add and assign Win32 apps to Microsoft Intune
- The Poor Man’s Remediation: Win32 Apps for Tenants Without Remediation Licenses
- Mozilla policy templates
- SasStu/Intune-Misc